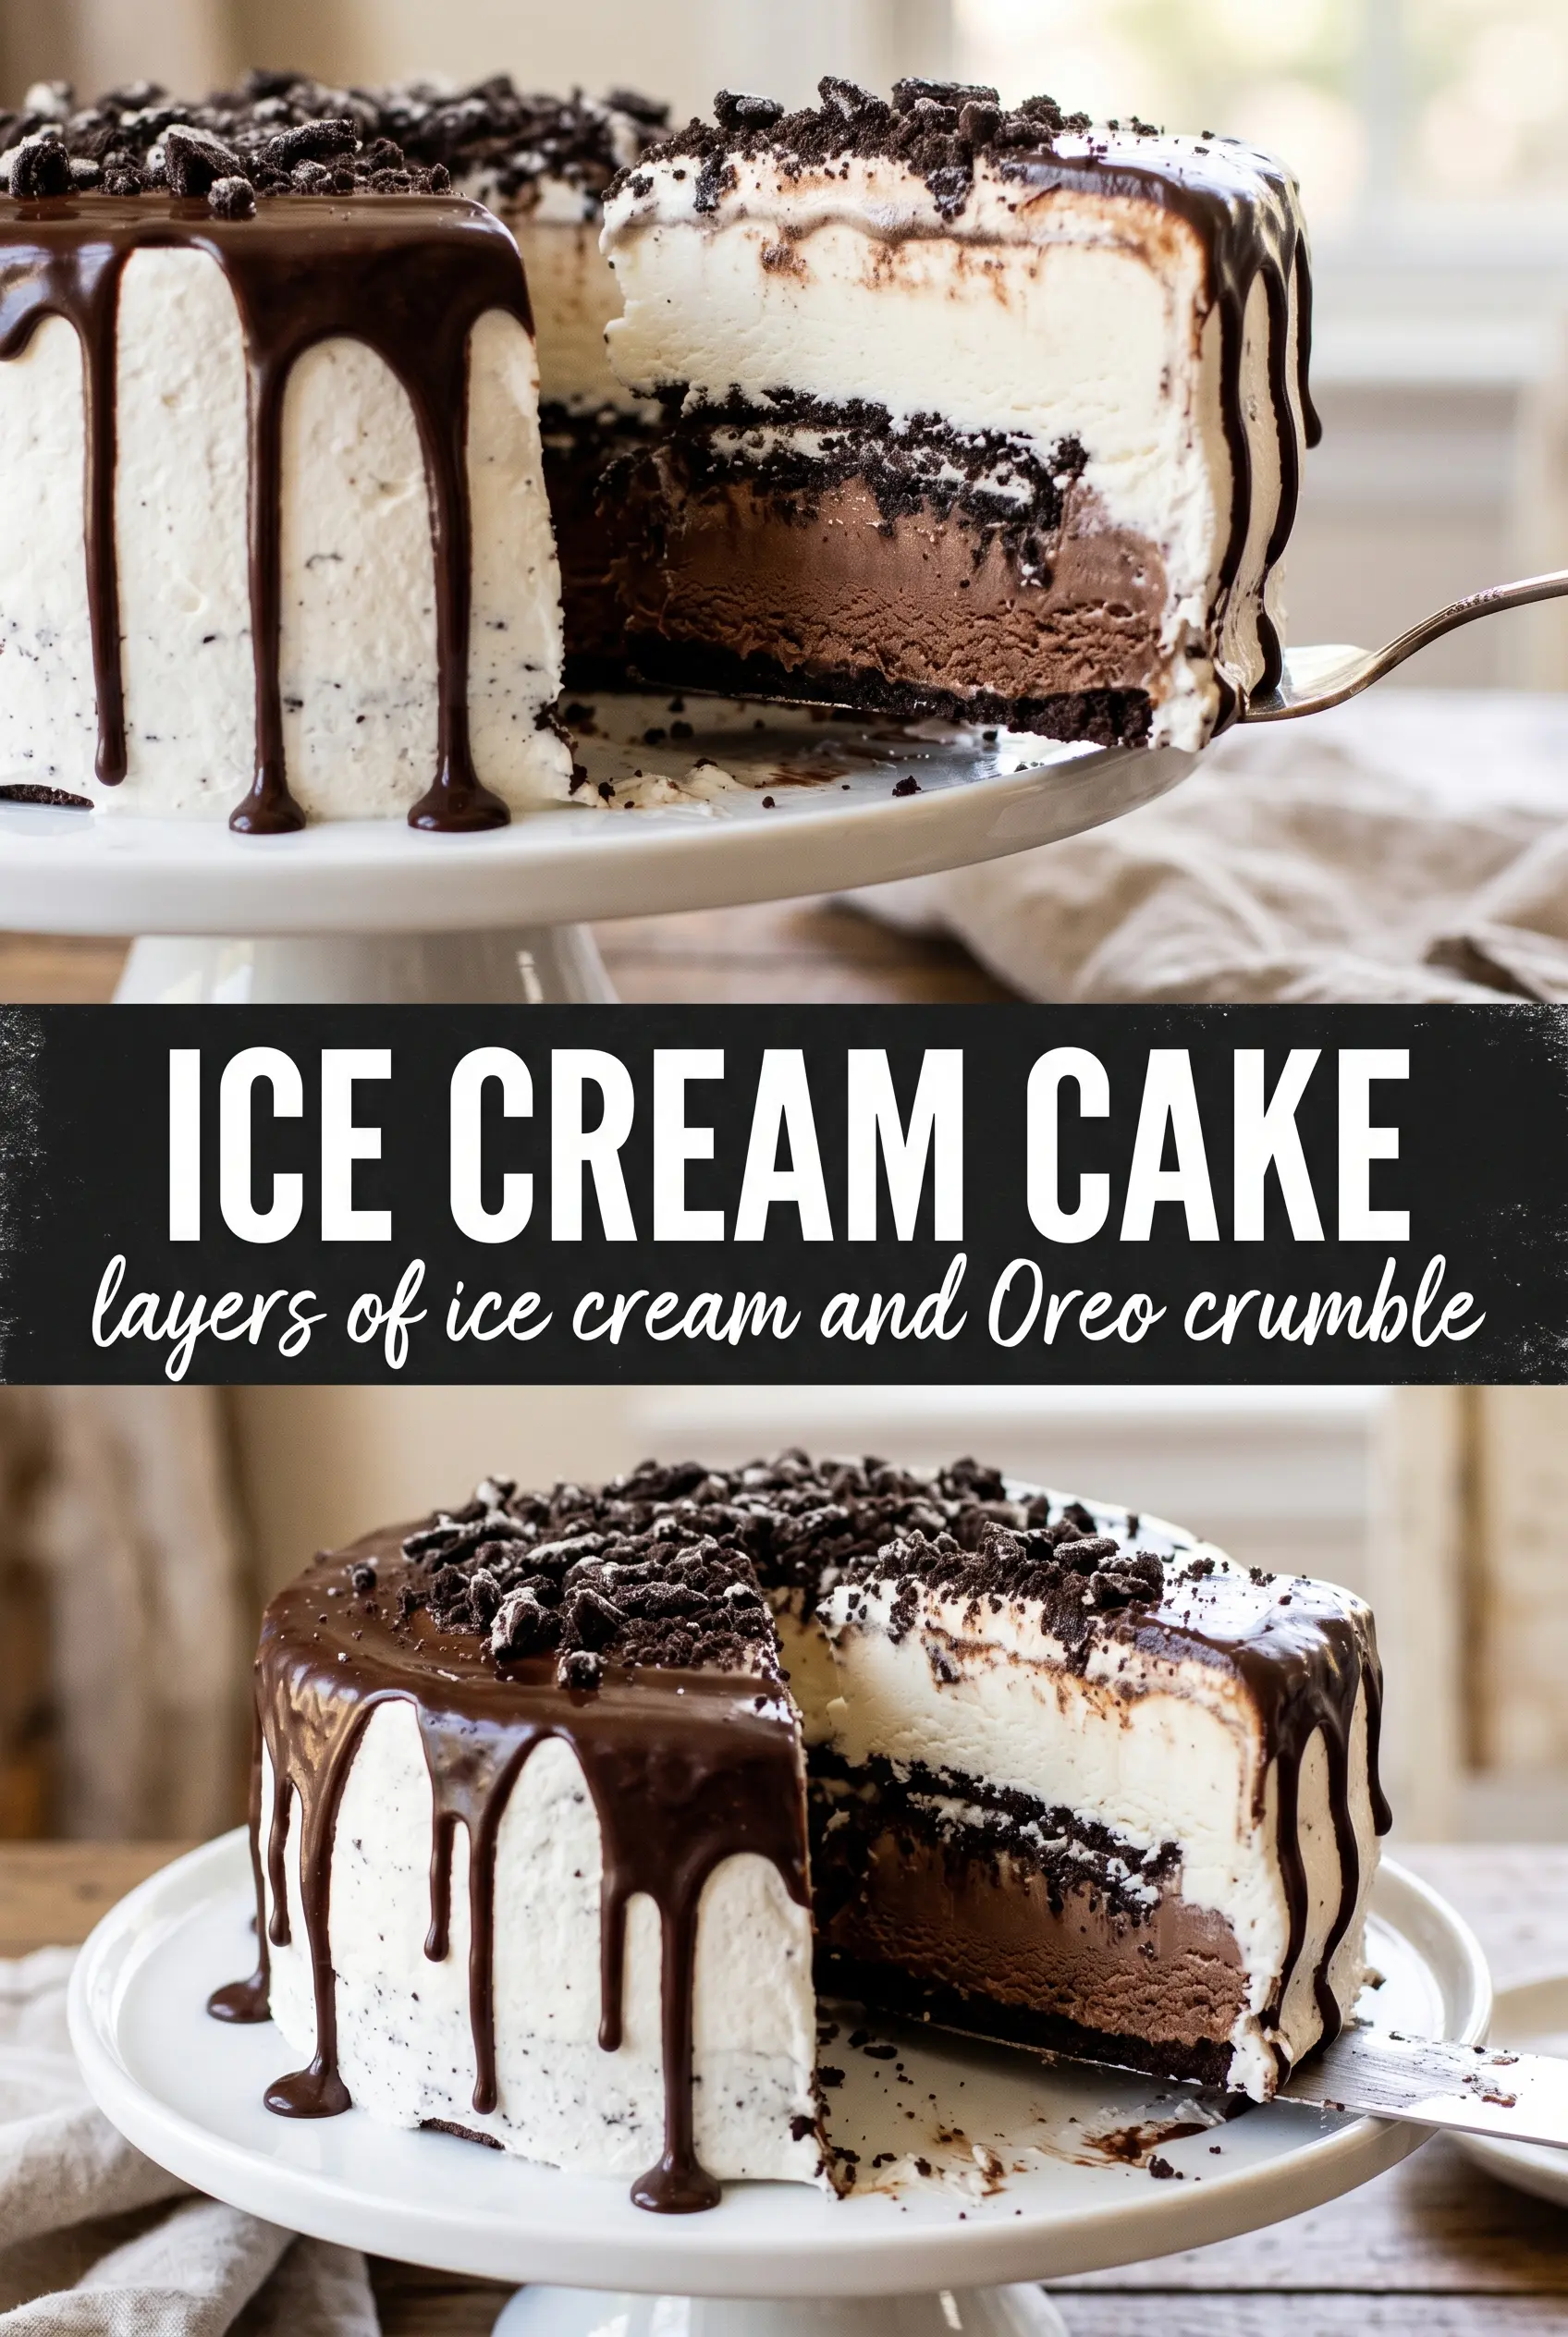
Cold, clean slices and a crunchy cookie crust make this ice cream cake the kind of dessert people remember long after the plates are cleared. The layers stay distinct instead of melting into one soft blur, and the fudge ribbon gives each bite a little pause before the strawberry and vanilla hit. It looks like a celebration, but it comes together with pantry-friendly ingredients and no oven at all.
The part that makes this version work is the freezing in stages. Each layer gets firm enough to support the next one, which keeps the cake from slumping and helps the slices hold their shape. A springform pan does the heavy lifting here, and a slightly softened ice cream base spreads evenly without tearing the crust underneath. The Oreos bring both structure and a darker, more chocolatey crunch than a plain crumb crust would.
Below, I’ve included the small details that matter most: how soft the ice cream should be, when the fudge needs a minute to cool, and how to get a clean slice without dragging the layers around. If you’ve ever had an ice cream cake collapse on the first cut, this method fixes the problem.
The layers froze up beautifully and the fudge stayed in a neat ribbon instead of soaking into the cake. I used a warm knife like you suggested and got clean slices right away.
Like this Oreo ice cream cake? Save it to Pinterest for birthdays, cookouts, and any night that needs a frozen dessert with clean layers and a fudge center.
The Reason Ice Cream Cake Usually Slumps Before You Slice It
The biggest mistake with ice cream cake is building it too fast. If the first layer isn’t firm before the next one goes on, the layers smear together and the fudge sinks where it shouldn’t. Staging the freezes is what keeps this cake looking like a cake instead of a scoop-and-mix situation.
The crust matters more than people think, too. Press it firmly and freeze it before adding ice cream so it sets into a base that can hold a clean slice. A springform pan is worth using here because it lets you release the cake without inverting it and risking cracked edges or a messy top.
What Each Layer Is Doing in This Ice Cream Cake
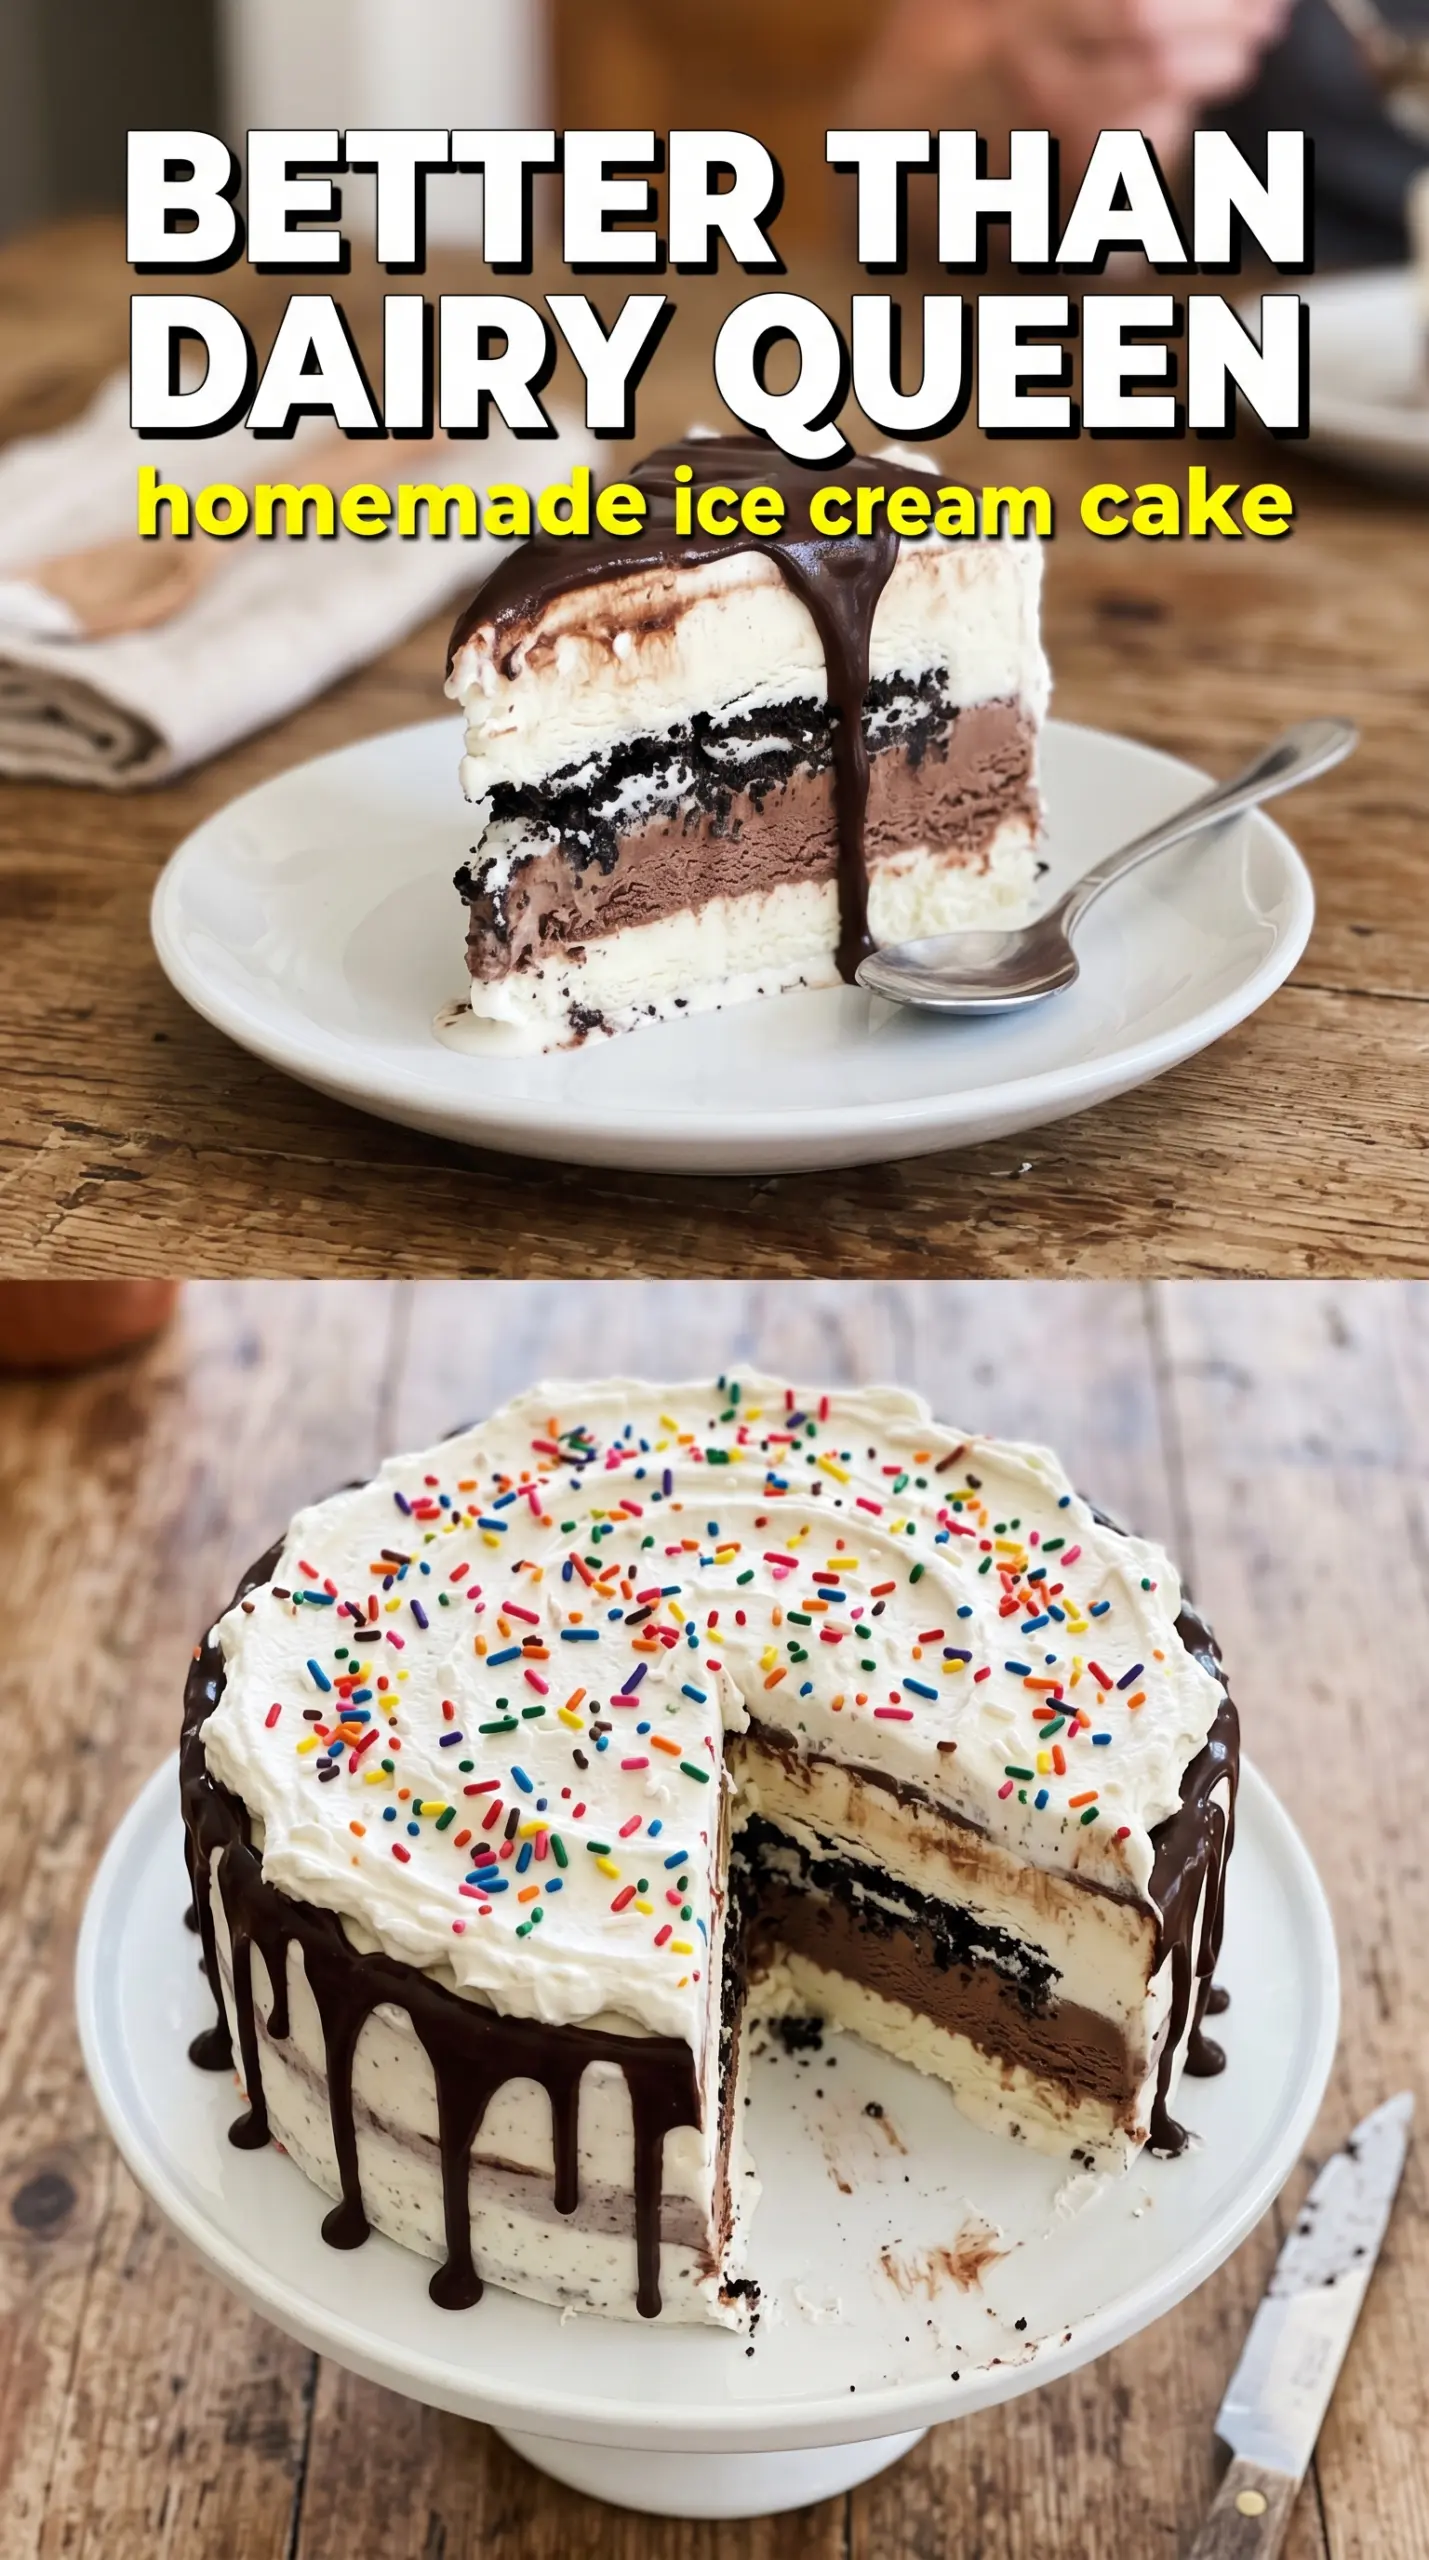
- Oreos — These give you a darker, sturdier crust than graham crackers and bring enough chocolate flavor to stand up to the vanilla and strawberry. Crush them fine so the crust packs tightly and doesn’t crumble when you slice.
- Butter — Melted butter binds the crumbs into a crust that freezes solid. If you skimp here, the base will shed crumbs every time you cut the cake.
- Vanilla ice cream — This is the first main layer, so it should be soft enough to spread but not melting around the edges. Let it sit at room temperature just until it gives under a spoon.
- Hot fudge sauce — Slightly cooled fudge keeps its ribbon instead of melting deep into the vanilla layer. Warm is fine; steaming hot will tunnel into the ice cream and blur the layers.
- Strawberry ice cream — This gives the cake color, brightness, and a second frozen layer that cuts through the richness. If you swap in another flavor, pick one that freezes firmly and doesn’t turn icy.
- Whipped topping or stabilized whipped cream — This finishes the cake without collapsing. Ordinary whipped cream can weep after a few hours, so stabilized cream is the better choice if the cake needs to sit out a bit before serving.
Building the Layers So They Stay Clean and Distinct
Pressing the Cookie Base
Mix the crushed Oreos with melted butter until every crumb looks damp, then press the mixture firmly into the bottom of a 9-inch springform pan. Use the bottom of a measuring cup to flatten it into an even layer. Freeze it for 15 minutes so the crust sets before the ice cream goes on. If the base is loose now, it will fall apart later when you cut the cake.
Spreading the Vanilla Layer
Scoop the softened vanilla ice cream onto the chilled crust and spread it into the corners with an offset spatula. Work quickly but gently so you don’t pull up the crust. Freeze for 1 hour until the surface feels firm to a light touch. If the ice cream is too soft at this stage, the fudge will melt into it instead of sitting in a distinct layer.
Adding the Fudge Ribbon
Drizzle the hot fudge over the set vanilla layer in an even band. The sauce should be cooled enough that it doesn’t melt the ice cream on contact, but not so cold that it turns stiff and hard to spread. Freeze for 15 minutes so the fudge locks in place. That short freeze is what keeps the next layer from dragging the chocolate around.
Finishing with Strawberry and Freezing Solid
Spread the strawberry ice cream over the fudge layer and smooth the top as level as you can. Cover the pan with plastic wrap and freeze for at least 4 hours, though overnight gives you the cleanest slices. The cake should feel rock solid before you unhook the pan. If it’s even slightly soft in the center, wait longer.
Decorating and Slicing
Run a warm knife around the inside edge of the pan, then release the springform and move the cake to a serving plate. Pipe whipped cream swirls around the top edge and scatter sprinkles over the center. For the cleanest cut, dip a sharp knife in hot water, wipe it dry, and slice immediately. Wipe the blade between cuts so the layers stay sharp instead of smeared.
How to Change the Flavor Without Losing the Structure
Chocolate-and-vanilla version
Swap the strawberry ice cream for chocolate and keep the fudge layer as written. You’ll get a deeper, more classic cookies-and-cream feel, and the cake will still freeze into clean slices because chocolate ice cream sets firmly.
Dairy-free ice cream cake
Use dairy-free ice cream, plant-based butter, and a coconut or dairy-free whipped topping. The texture will be a little softer once sliced, so give it the full overnight freeze if you can.
No springform pan
Line a deep 9-inch cake pan with parchment that overhangs the sides like a sling. It’s not as elegant to unmold, but it works if the whole cake is frozen solid before you lift it out.
Birthday cake style
Keep the vanilla layer, swap the strawberry for cookies-and-cream or cake batter ice cream, and use colorful sprinkles on top. The flavor gets sweeter and more festive, but the same freezing schedule still applies.
Storage and Reheating
- Refrigerator: Not recommended. This cake softens fast and loses its shape within minutes at room temperature.
- Freezer: Wrap tightly and freeze for up to 2 weeks for the best texture. After that, the crust can start to taste stale and the ice cream may pick up freezer flavor.
- Reheating: No reheating needed. For serving, let the cake sit at room temperature for 5 to 10 minutes, just until the knife passes through without cracking the layers.
Questions I Get Asked About This Recipe
Ice Cream Cake
Ingredients
Equipment
Method
- Mix crushed Oreo cookies with melted butter until evenly combined, then press firmly into the bottom of a 9-inch springform pan.
- Freeze the crust for 15 minutes until set.
- Spread slightly softened vanilla ice cream in an even layer over the Oreo crust, smoothing the top.
- Freeze for 1 hour until firm.
- Drizzle slightly cooled hot fudge sauce over the vanilla layer in an even ribbon.
- Freeze for 15 minutes to help the fudge set.
- Spread slightly softened strawberry ice cream over the fudge layer, smooth the top, cover with plastic wrap, and keep fully covered.
- Freeze for at least 4 hours or overnight until solid.
- Run a warm knife around the edge, release the springform, and transfer the cake to a serving plate.
- Pipe swirled whipped cream around the top edge and scatter sprinkles across the center.
- Slice with a hot knife, then serve immediately.