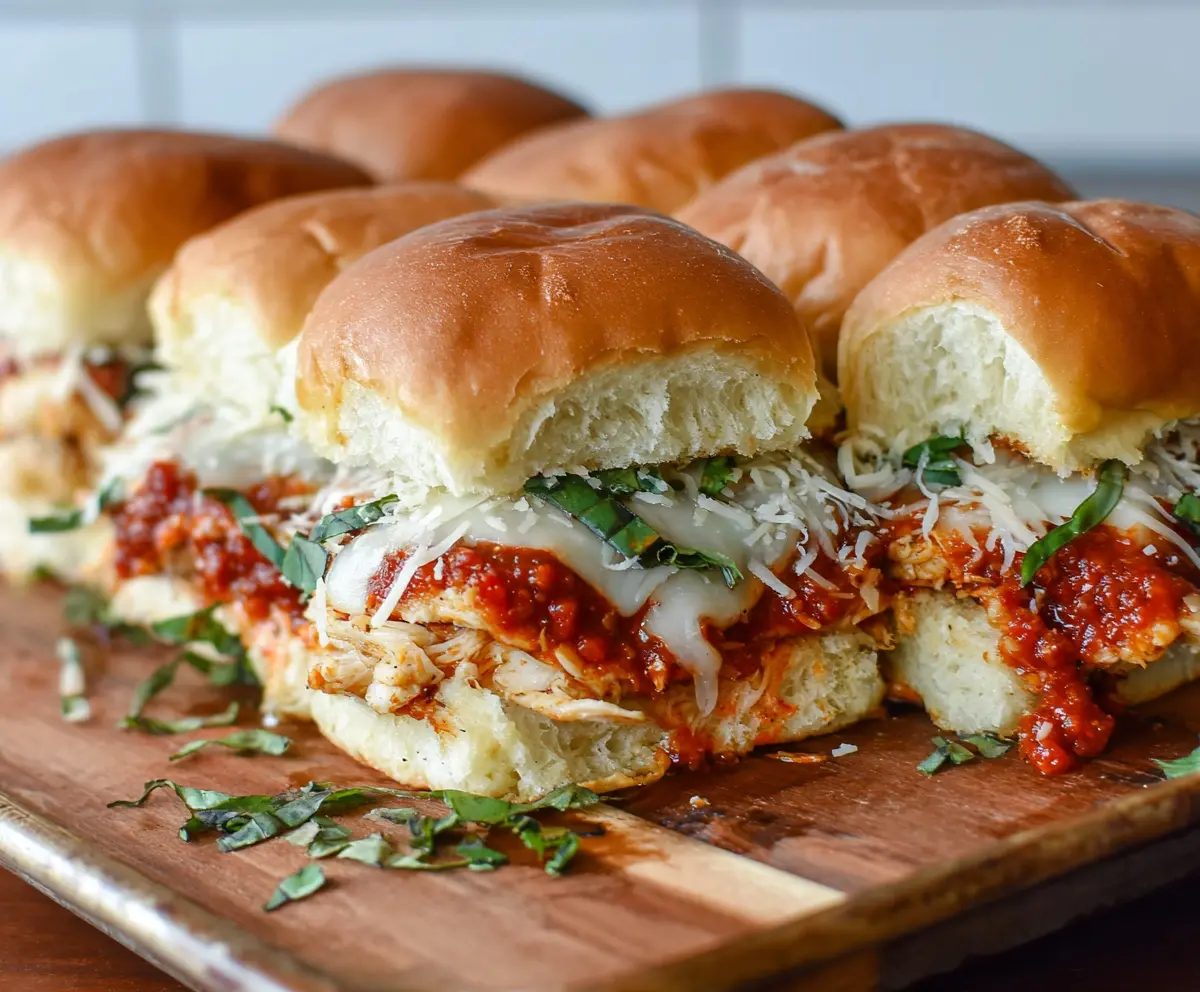
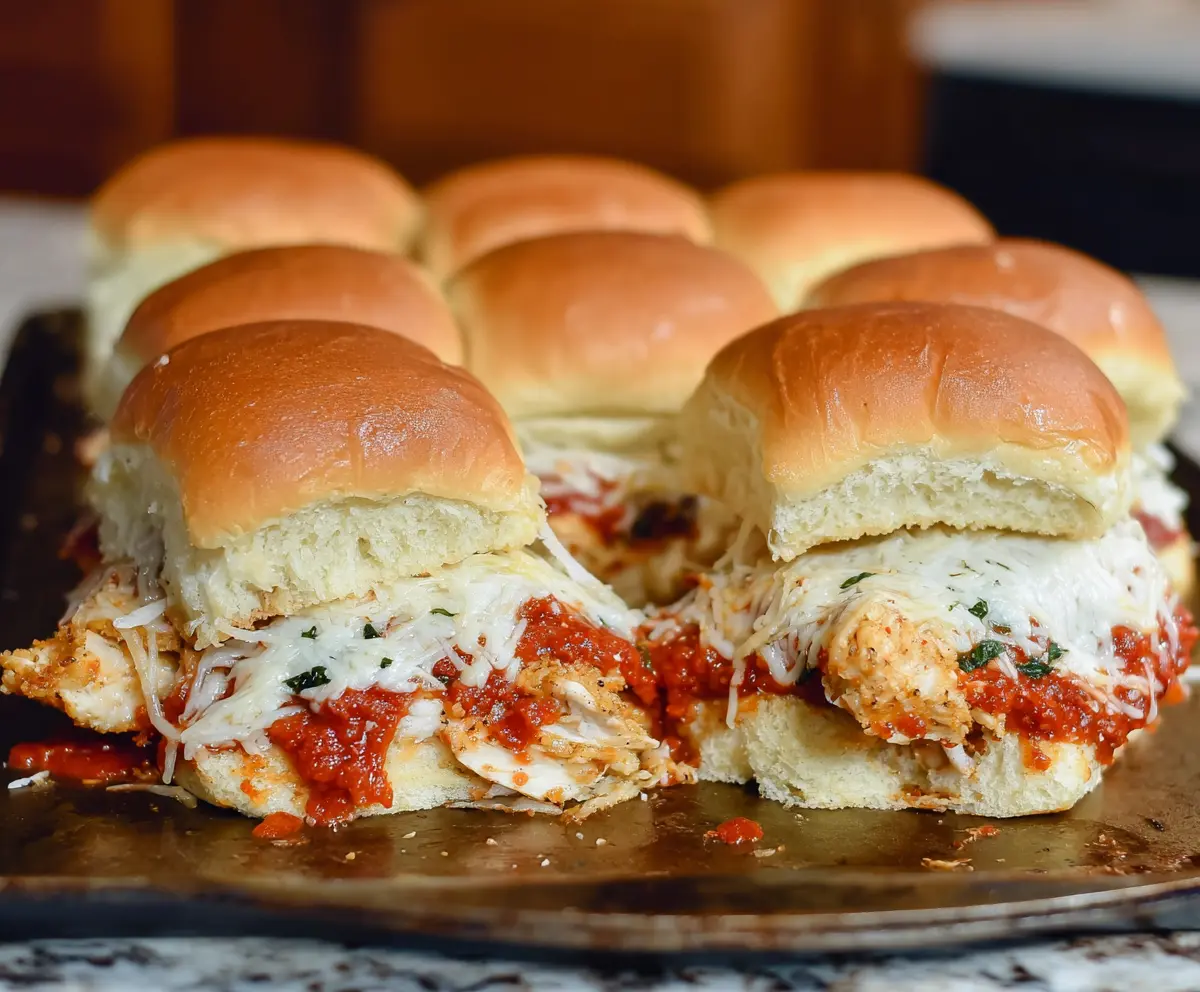
These Garlic Chicken Parmesan Sliders are little bites of happiness! With juicy chicken coated in garlic butter and topped with melty cheese, they’re sure to please anyone.
How can you go wrong with cheesy goodness and garlic? I often make extra because they disappear so fast. Pair them with a side salad for a fun meal! 🥗
Key Ingredients & Substitutions
Slider Buns: I recommend using soft dinner rolls for the best texture. If you’re looking for a healthier option, whole wheat slider buns work too. You can also use gluten-free buns if needed.
Shredded Chicken: You can use rotisserie chicken for convenience, or leftover chicken works well too. If you want a vegetarian version, try replacing the chicken with roasted vegetables!
Marinara Sauce: Store-bought is totally fine. For a homemade touch, make your own sauce with canned tomatoes, garlic, and herbs. You can substitute with pesto for a different flavor.
Cheese: Mozzarella is traditional, but feel free to swap in provolone or even a vegan cheese if you prefer. Adding a little smoked Gouda can add a great depth of flavor too.
Butter and Garlic: Use olive oil instead of butter for a dairy-free option. You can mix in different herbs like thyme or oregano for extra flavor if you like.
How Do I Get the Right Cheese Melt?
Melted cheese is key to these sliders! To ensure it melts perfectly, layering is important. Start with the marinara first before adding cheese. Here’s how you can achieve the best melt:
- Preheat your oven properly to 350°F (175°C) before baking.
- Cover the sliders with foil initially to trap steam, helping the cheese melt without burning.
- Remove the foil in the last few minutes to let the tops get nice and golden brown.
Poking a few holes in the foil can also allow steam to escape and give you that perfect, bubbly texture. Enjoy your sliders, they’re going to be a crowd favorite!
Garlic Chicken Parmesan Sliders
Ingredients You’ll Need:
For the Sliders:
- 12 slider buns (soft dinner rolls)
- 2 cups cooked shredded chicken breast
- 1 cup marinara sauce
- 8 oz mozzarella cheese, sliced or shredded
- 1/2 cup grated Parmesan cheese
For the Garlic Butter:
- 4 tbsp unsalted butter, melted
- 3 cloves garlic, minced
- 1 tsp Italian seasoning (optional)
- Salt and pepper, to taste
For Garnishing:
- Fresh basil, thinly sliced
How Much Time Will You Need?
This delicious recipe takes about 10 minutes to prep and 20-25 minutes for baking. So, in roughly 35 minutes, you’ll have mouthwatering sliders ready to serve!
Step-by-Step Instructions:
1. Prepare Your Oven:
Start by preheating your oven to 350°F (175°C). This ensures that when your sliders go in, they will cook evenly and melt together perfectly.
2. Make the Garlic Butter:
In a small bowl, mix together the melted butter, minced garlic, and Italian seasoning if you’re using it. Give it a good stir and set it aside for later.
3. Slice the Buns:
Gently slice the slider buns horizontally, keeping them all connected so they form a single slab. This makes it easy to assemble the sliders!
4. Assemble the Base:
Place the bottom half of the buns on a baking sheet or a baking dish. This is where all the goodness will start to come together!
5. Add the Chicken:
Spread the cooked shredded chicken evenly over the bottom buns. This will be the hearty filling of your sliders.
6. Layer with Marinara:
Spoon marinara sauce generously over the chicken, making sure to cover it well for that delicious flavor.
7. Cheese It Up:
Sprinkle mozzarella cheese evenly over the marinara sauce. Next, top it all off with grated Parmesan cheese for that perfect cheesy topping.
8. Finish Assembly:
Carefully cover it all with the top half of the slider buns.
9. Brush with Garlic Butter:
Take the garlic butter mixture you prepared earlier and brush it generously over the tops of the buns. This adds amazing flavor!
10. Bake the Sliders:
Cover the sliders loosely with aluminum foil and pop them in the oven. Bake for about 15-20 minutes until the cheese is melted and everything is warmed through. For an extra touch, you can remove the foil and bake for an additional 3-5 minutes to lightly brown the tops.
11. Garnish and Serve:
Once done, garnish with freshly sliced basil to add a vibrant touch. Cut between the buns to separate them into individual sliders.
Now, they’re ready to be served hot! Enjoy every cheesy, garlicky bite of these fabulous sliders—perfect for parties or a family meal!
Can I Use Store-Bought Rotisserie Chicken?
Absolutely! Using store-bought rotisserie chicken is a great time-saver. Just shred the chicken and it’s ready to go into your sliders!
Can I Make These Sliders Ahead of Time?
Yes! You can assemble the sliders up to a day in advance. Just cover them tightly and refrigerate. When you’re ready to bake, simply pop them in the oven straight from the fridge, adding a few extra minutes to the baking time.
How Should I Store Leftovers?
Store any leftover sliders in an airtight container in the fridge for up to 3 days. Reheat in the oven at 350°F (175°C) for about 10-15 minutes to keep them warm and gooey.
Can I Use Different Ingredients in the Sliders?
Definitely! You can customize your sliders by using different cheeses, adding sautéed veggies, or even swapping the chicken with ground beef or turkey. Feel free to get creative!