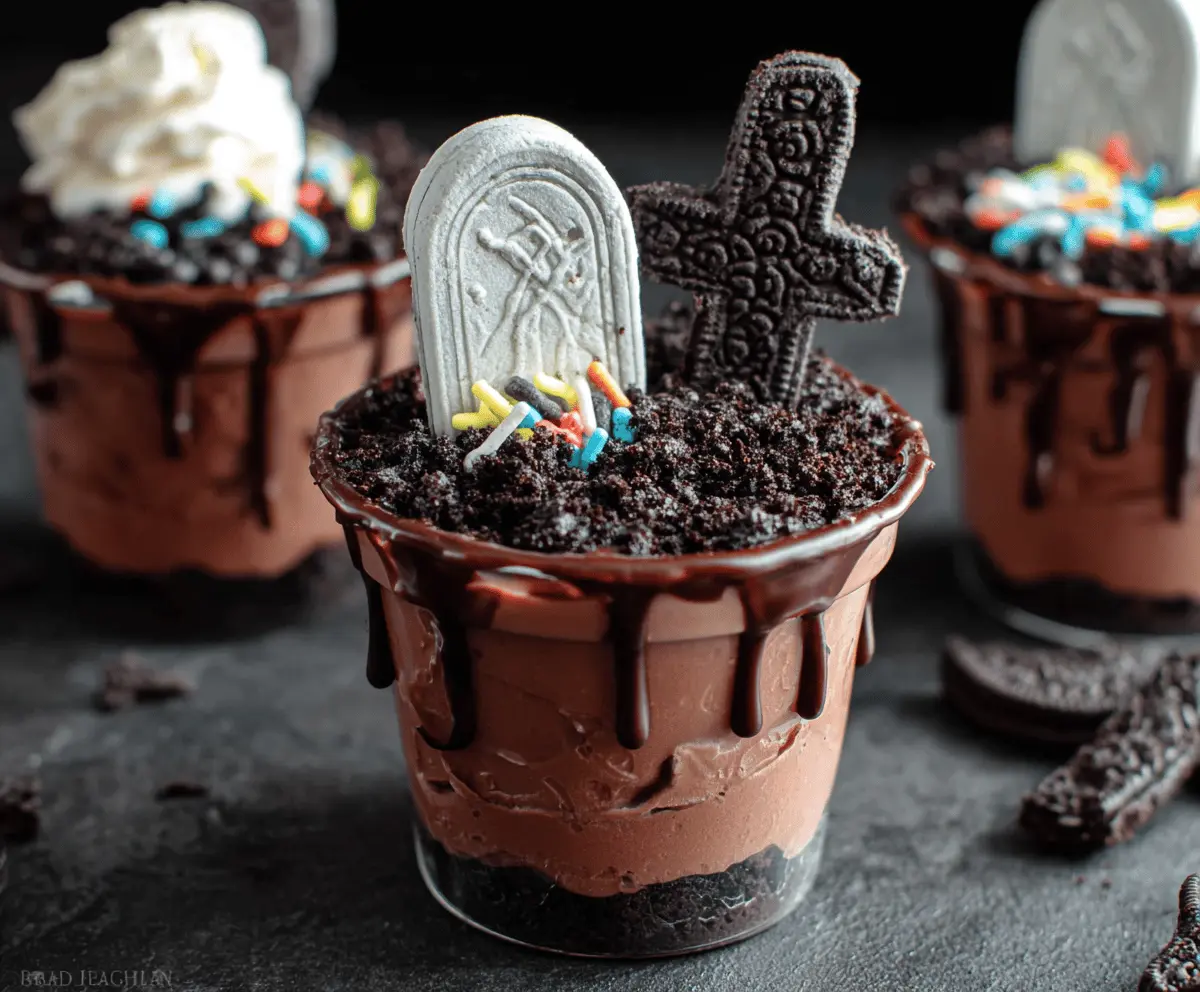
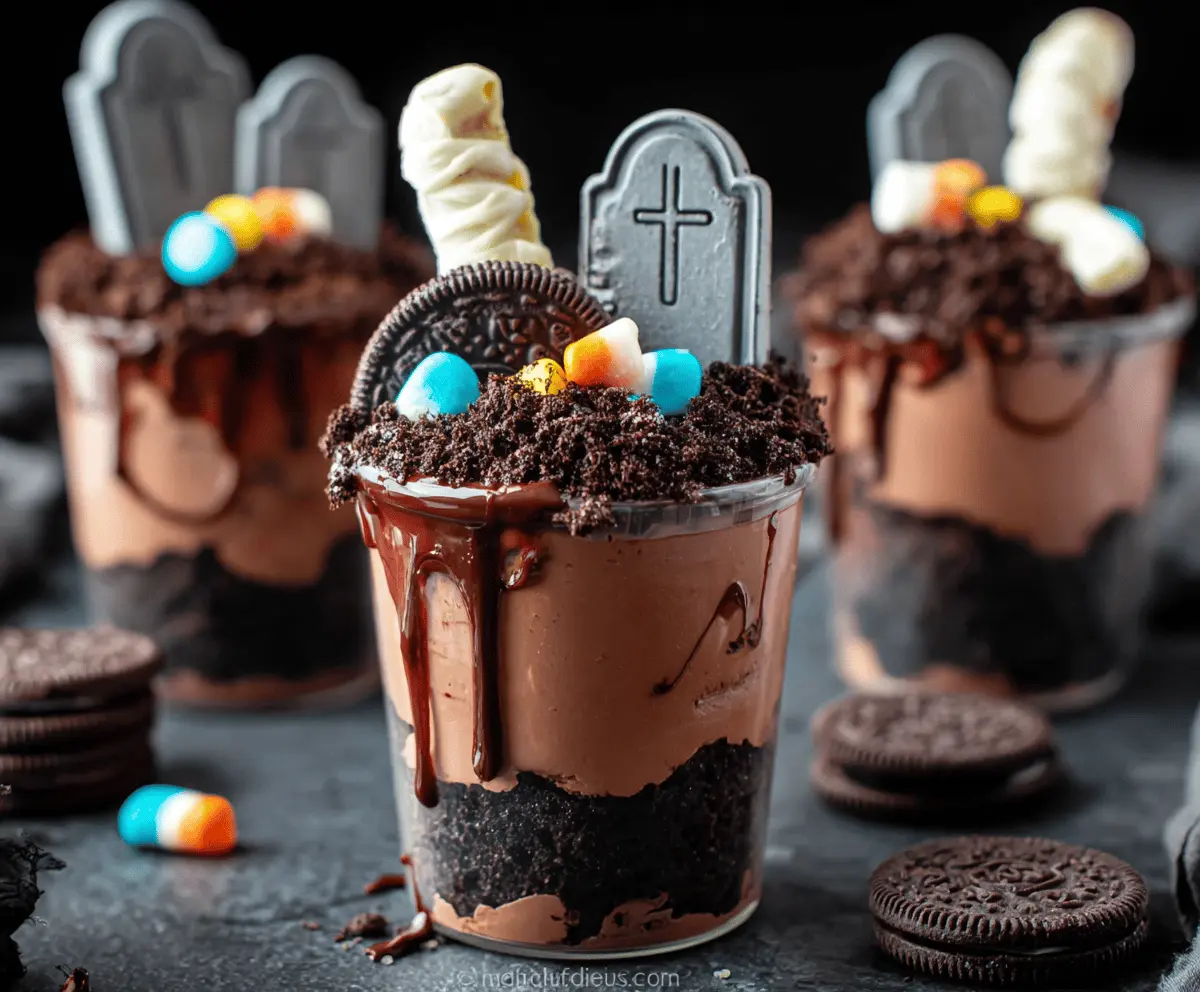
These Graveyard Chocolate Pudding Cups are a fun and spooky treat! They are made with rich chocolate pudding, creamy whipped topping, and crunchy cookie crumbs.
Perfect for Halloween, I love sprinkling gummy worms on top for that extra scare factor! These are super easy to make and always a hit with kids—and grown-ups too! 🎃
Key Ingredients & Substitutions
Chocolate Pudding: You can use either store-bought or homemade chocolate pudding. If you’re short on time, instant pudding mixes work great too! For a healthier option, try a sugar-free version.
Oreo Cookies: While Oreos give that classic chocolate flavor, you can substitute them with any chocolate sandwich cookies you’d like. If you want a gluten-free treat, look for gluten-free chocolate cookies!
Whipped Topping: If you’re avoiding dairy, try coconut whipped cream or a dairy-free whipped topping alternative. It tastes great and still gives that fluffy texture!
Candy Decorations: Get creative with candy! Instead of candy corn, you can use chocolate-covered nuts or colorful gummy candies. For the tombstones, use any fun Halloween-themed candy or even make your own from chocolate!
How Do I Layer the Cups Perfectly?
Layering the pudding cups is key to achieving that graveyard look. Here’s how to do it right:
- Start by evenly distributing the cookie crumbs into each cup, pressing gently to create a solid base.
- When adding pudding, deal with any air pockets by gently tapping the cups on the counter. This helps the pudding settle nicely.
- Don’t be afraid to re-crumble cookies to get the perfect “dirt” effect on your layers. Each layer should be visible for the best presentation.
Chill your cups before serving to let the layers meld together. This time in the fridge makes all the difference!
Graveyard Chocolate Pudding Cups
Ingredients:
- 3 cups prepared chocolate pudding (store-bought or homemade)
- 20 Oreo cookies (or similar chocolate sandwich cookies)
- 1 cup whipped topping (like Cool Whip)
- 1/2 cup chocolate syrup
- Candy decorations for topping:
- Candy corn
- Small gummy worms
- Edible tombstone decorations (can be made from molded chocolate or purchased Halloween candy tombstones)
Time Needed:
This spooky treat will take about 20 minutes of prep time. Don’t forget to chill them for at least 1 hour in the refrigerator before serving. Perfect for gathering with friends and celebrating Halloween!
Step-by-Step Instructions:
1. Prepare Cookie Crumbs:
Start by crushing the Oreo cookies. You can use a food processor for a fine result, or place the cookies in a ziplock bag and crush them with a rolling pin or your hands until they look like dirt. This will create the base for your cups!
2. Layering the Cups:
Spoon about 1/4 cup of the crushed cookie crumbs into the bottom of each serving cup. This is your “graveyard dirt” layer, so make it nice and even!
3. Add Pudding Layer:
Next, pour or spoon the chocolate pudding over the cookie crumbs until they are completely covered. Fill the cups about halfway with pudding for a nice layering effect.
4. Add More Cookie Crumbs:
Now, it’s time to sprinkle another layer of those cookie crumbs on top of the pudding. This additional layer will mimic the dirt of the graveyard, making the complete look come together beautifully!
5. Top with Whipped Topping:
Add a dollop of whipped topping on top of the cookie layer, smoothing it gently with the back of a spoon. This will create a fluffy, spooky surface.
6. Decorate:
Drizzle some chocolate syrup over the whipped topping and let it slip down the sides of the cup a little for that messy, spooky aesthetic.
7. Insert Tombstone Decorations:
Carefully insert the edible tombstone decorations upright into the whipped topping. This is where your graveyard theme really starts to shine!
8. Add Creepy Crawlers:
Place an Oreo cookie half or a gummy worm to make it look like they are crawling out of the grave. Get creative with this step!
9. Scatter Candy:
Finish by scattering some candy corn and gummy worm pieces on top of everything. This will add an extra festive touch and enhance the graveyard effect.
10. Repeat for All Cups:
Continue layering and decorating until all your pudding cups are ready to go. Each one is sure to be unique!
11. Chill and Serve:
Cover and chill the pudding cups in the refrigerator for at least 1 hour. This will set the layers nicely and make them even tastier.
Enjoy your spooky Graveyard Chocolate Pudding Cups, perfect for Halloween parties and fun gatherings! They’re sure to be a hit with everyone!
Can I Use a Different Type of Cookie for the Crust?
Absolutely! If you’re not a fan of Oreos, you can use any chocolate sandwich cookie or even graham crackers for a different texture. Just crush them similarly to create your “dirt” layer.
Can I Make This Recipe Ahead of Time?
Yes, you can prepare these cups in advance! Assemble them up to a day ahead and store them in the refrigerator. Just add the candy toppings right before serving for the best freshness and presentation.
How Should I Store Leftovers?
If you have any leftovers, store them in an airtight container in the refrigerator. They should stay good for about 2-3 days. Just remember that the cookies may become a bit soggy over time, but they will still taste delicious!
Can I Use Homemade Pudding Instead of Store-Bought?
Definitely! Homemade chocolate pudding will enhance the flavor of the cups. Just make sure to let it cool before assembling to avoid melting the cookie layers.