These Strawberry Heart Cake Pops are adorable treats that are perfect for any celebration! Made with fluffy strawberry cake and coated in sparkly pink chocolate, they are as cute as they are tasty.
Making these is a fun project—just think of all the cute faces you’ll see when you hand them out! I love serving them at parties, and they disappear in a flash every time. 🍓❤️
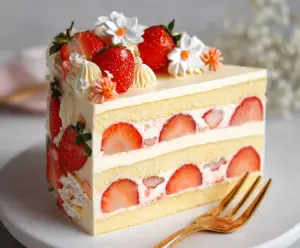
Key Ingredients & Substitutions
Cake Mix: A box of white or vanilla cake mix works great for convenience! If you want a homemade touch, try using your favorite vanilla cake recipe instead. You can also use gluten-free cake mix if needed.
Frosting: I like strawberry-flavored frosting for its fruity taste. You can swap it out for cream cheese frosting mixed with strawberry puree for a richer flavor. If you’re trying to cut sugar, consider using a sugar-free frosting!
Fresh Strawberries: Heart-shaped strawberries are a cute option if you can find them. Whole strawberries with leaves also look lovely. If strawberries aren’t in season, you can use other berries like raspberries or blueberries.
Chocolate: I recommend white chocolate or candy melts for a smooth coating. If you want to try something different, dark chocolate works well, too. You can find different colors of candy melts to match your theme, like pink or red.
Decorations: The heart-shaped fondant pieces add a sweet touch, but you can skip them or use sprinkles if that’s what you have on hand. Coarse sugar gives a fun sparkle to your cake pops—feel free to leave it out for a simpler look.
How Do You Ensure Perfectly Shaped Cake Pops?
Shaping the cake pops can be tricky! Here are some easy steps to help you get those heart shapes just right:
- After crumbling the cooled cake, gradually add frosting until it holds shape without being too wet—this is key!
- Use your hands or a heart-shaped mold to form the mixture into heart shapes. Don’t rush—make sure they are packed snug.
- If using whole strawberries, clean and dry them, then just insert the stick for a neat finish.
Chilling the pops not only helps them firm up but also makes dipping easier, so don’t skip this step!

How to Make Adorable Strawberry Heart Cake Pops
Ingredients You’ll Need:
For the Cake:
- 1 box white or vanilla cake mix (or homemade cake equivalent)
- Ingredients needed to prepare the cake mix (usually eggs, oil, and water)
For the Frosting:
- 1 cup strawberry-flavored frosting (or cream cheese frosting mixed with strawberry puree)
For the Decorations:
- Fresh strawberries (heart-shaped if possible, or whole strawberries with leaves)
- 2 cups white chocolate or candy melts
- Pink candy melts (optional, for extra decoration)
- Red or pink heart-shaped fondant decorations or edible hearts
- Coarse sugar or white sanding sugar (optional)
- Lollipop sticks or sturdy cake pop sticks
How Much Time Will You Need?
This delightful recipe will take about 30 minutes of prep time, plus at least 1 hour for chilling the cake pops. Overall, you should plan for around 2 hours from start to finish, including baking, cooling, and decorating!
Step-by-Step Instructions:
1. Bake the Cake:
Start by preparing the cake mix according to the package instructions. If you’re using a homemade recipe, bake it in a 9×13 inch pan. Once it’s baked, let it cool completely so it’s easy to crumble.
2. Prepare Cake Crumbs:
In a large bowl, crumble the cooled cake into fine crumbs. Make sure there are no big pieces left, as this will help create a smooth texture for your cake pops.
3. Mix with Frosting:
Gradually add the strawberry frosting to the cake crumbs. Mix well until the mixture holds together but isn’t too sticky or wet. It should feel like play-dough!
4. Shape Cake Pops:
Take small amounts of the cake mixture and shape them into heart shapes using your hands or a heart-shaped mold. If you’re using fresh strawberries, you can keep them whole for a heart-shaped treat as well!
5. Insert Sticks:
Carefully insert lollipop sticks halfway into each heart-shaped cake pop or strawberry. This will help you hold them while decorating!
6. Chill:
Place the formed cake pops onto a tray lined with parchment paper. Pop them into the refrigerator for at least 1 hour to help them firm up—it makes dipping a whole lot easier!
7. Melt Chocolate:
While your cake pops chill, melt the white chocolate or candy melts in a microwave-safe bowl. Heat it in short bursts of 30 seconds, stirring each time until it’s smooth. If you want to use pink candy melts for decorating, melt those separately too.
8. Dip Cake Pops:
Once the cake pops have chilled, dip each one into the melted white chocolate until fully coated. Let any excess chocolate drip off before setting them down. If you’re using strawberries, feel free to dip them partially for a fun look!
9. Decorate:
Before the chocolate sets, sprinkle the coarse or sanding sugar over the cake pops to mimic sugared strawberries. If you like, drizzle melted pink candy melts over the white-coated pops for an extra pop of color!
10. Add Heart Decoration:
While the coating is still sticky, place small fondant or edible heart decorations on top of each dipped cake pop. This adds a sweet finishing touch!
11. Dry Completely:
Stand the cake pops upright in a styrofoam block or a cake pop stand. Allow them to dry completely so the chocolate sets up nicely.
12. Serve:
After they’re set, arrange your beautiful strawberry heart cake pops on a plate, and they’re ready to impress! Perfect for Valentine’s Day or any special occasion!
Enjoy your baking and the delightful treats that come from it!
Can I Use a Different Flavor of Cake Mix?
Absolutely! While vanilla and white cake work best for this recipe, you can use any flavor cake mix you prefer. Chocolate or lemon cakes would bring a delicious twist to your cake pops!
How Should I Store the Cake Pops?
Keep your cake pops in an airtight container at room temperature for up to 3 days, or in the fridge for up to a week. If you need to store them for longer, you can freeze uncoated pops for up to a month—just let them thaw in the fridge before dipping!
Can I Make the Cake Pops Ahead of Time?
Yes! You can prepare the cake mixture and shape the pops up to 2 days in advance. Just keep them chilled in the refrigerator until you’re ready to coat and decorate them.
What if My Chocolate Coating is Too Thick?
If your chocolate is too thick for dipping, try adding a tiny bit of coconut oil or vegetable shortening to the melted chocolate. This will thin it out and make dipping easier!