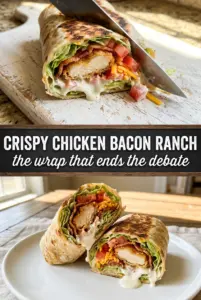
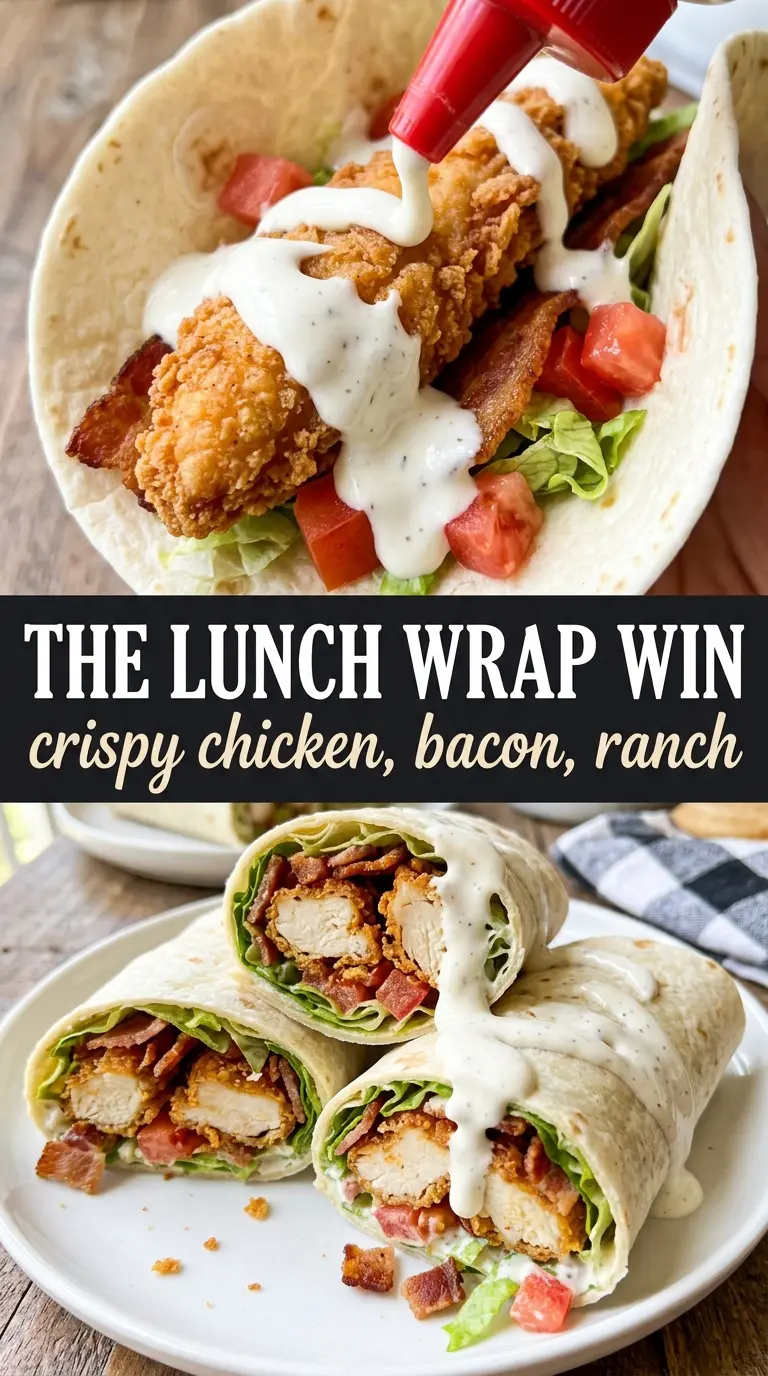
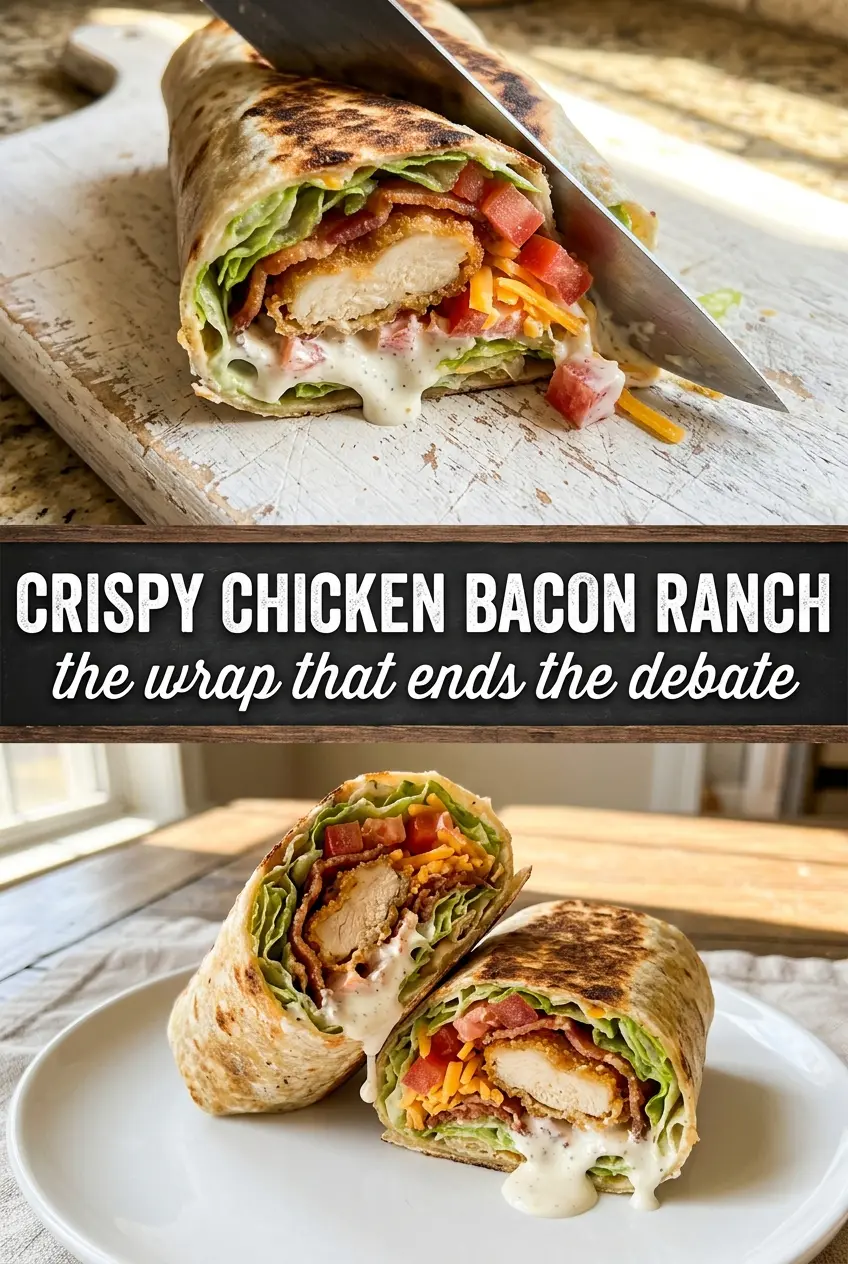
Crispy chicken, smoky bacon, cool ranch, and a warm toasted tortilla hit all the right notes in one wrap. The best versions don’t go soggy before the first bite, and they don’t hide the fillings in a bland, floppy shell. When the chicken is properly breaded and seared, the bacon stays crisp, and the tortilla gets a light skillet toast, you get a wrap that eats like something from a good lunch counter, not a rushed desk meal.
The trick here is building layers that each keep their own texture. Buttermilk gives the chicken a little tenderness and helps the panko cling, while Parmesan adds extra browning and salt without making the crust heavy. I like to let the cooked chicken rest for a couple of minutes before slicing so the juices stay in the meat instead of running into the tortilla.
Below you’ll find the few small details that make this wrap hold together from the first cut to the last bite, plus a couple of easy swaps if you want to change the filling without losing the crunch.
The chicken came out crisp without getting greasy, and the wrap held together even after I sliced it in half. The toasted tortilla made a big difference.
Love the crispy chicken, bacon, and ranch layers? Save this toasted chicken bacon ranch wrap for a fast lunch that still feels fresh and crunchy.
The Part That Keeps This Wrap Crisp Instead of Soggy
The mistake most people make with a chicken wrap like this is loading everything in while the chicken is still steaming hot. That trapped heat turns the tortilla soft, and the ranch starts soaking into the breading before you even get to the table. Let the chicken rest after cooking, then slice it and build the wrap with the lettuce between the sauce and the hot chicken. That little buffer helps keep the crunch where it belongs.
The second point is the final toast in the skillet. It doesn’t just brown the tortilla; it seals the seam and gives the outside that crackly, lightly crisp finish that makes the whole wrap hold together. If the pan is too hot, the tortilla will scorch before the cheese inside starts to melt. Medium heat is the sweet spot here.
What Each Ingredient Is Doing in the Wrap
- Chicken tenders or thin breasts — Thin pieces cook fast and evenly, which keeps the crust golden before the meat dries out. If you use breasts, pound them to an even thickness so the ends don’t overcook before the center is done.
- Buttermilk — This gives the chicken a little tenderness and helps the breading cling in a thicker coat. Regular milk won’t grab the crumbs the same way, though plain yogurt thinned with a splash of water can stand in.
- Panko and Parmesan — Panko brings the crisp, airy texture, and Parmesan helps the coating brown and adds a salty edge. The cheese also helps the crust feel more substantial, which matters once it’s tucked into a tortilla with sauce.
- Ranch dressing — This is the binder that ties the wrap together, but don’t drown the tortilla. A thin, even layer gives you creaminess without turning the wrap soggy halfway through.
- Romaine, tomatoes, and bacon — Romaine stays crisper than softer lettuces, cherry tomatoes bring a juicy bite, and bacon gives you salt and smoke. If you skip the bacon, the wrap still works, but it loses the savory punch that makes it feel complete.
- Flour tortillas — Use the big, pliable kind so they roll without tearing. Warming them first is not optional; cold tortillas crack and split right when you’re trying to seal the wrap.
The Sequence That Gives You a Golden Crust and a Tight Roll
Soaking and Coating the Chicken
Soak the chicken in buttermilk for about 15 minutes, just long enough to tack on some tenderness without turning the coating wet and slippery. When you press the chicken into the panko mixture, use your hands to pack the crumbs onto every side so the crust forms a solid shell. If the breading looks patchy, it will shed in the pan. A firm coating gives you those crisp edges that stay on the chicken after slicing.
Frying to a Deep Golden Finish
Heat the olive oil over medium-high until it shimmers, then lay the chicken in without crowding the pan. You want a steady sizzle, not an aggressive sputter that burns the coating before the center cooks through. Flip once the first side is deep golden and releases easily. Pull it when the thickest part hits 165°F, then rest it briefly so the juices settle and the crust stays crisp.
Building the Wrap in the Right Order
Warm the tortillas until they’re soft and flexible, then spread the ranch in a thin layer. Add the lettuce first, then tomatoes, cheese, bacon, and sliced chicken so the greens act as a barrier between the tortilla and the juicier fillings. Roll it tightly, tucking the sides in as you go. If you overfill it, the seam won’t hold and the toasted wrap will split when you turn it in the pan.
Toasting and Slicing
Set the wrap seam-side down in the skillet and toast it until the tortilla turns golden and lightly crisp on both sides. The cheese inside should start to soften, which helps glue the wrap together without turning it greasy. Slice diagonally with a sharp knife so the filling shows cleanly at the cut edge. That cut side is where you’ll see the chicken, bacon, and ranch layered the way they should be.
How to Change This Wrap Without Losing the Crunch
Make it gluten-free
Use gluten-free panko and check that your ranch is gluten-free too. The texture stays close to the original, though you may need to handle the breading a little more gently because gluten-free crumbs can be looser in the pan.
Skip the dairy
Use unsweetened dairy-free yogurt thinned with a little water in place of the buttermilk, and choose a dairy-free ranch and cheese alternative. The wrap will still toast well, but the filling will taste a little lighter and less rich than the original.
Turn it into a BLT-style chicken wrap
Leave out the cheddar and add extra tomato and lettuce for a fresher, sharper bite. This version tastes a little brighter and less rich, and the chicken stays the main event instead of competing with the cheese.
Storage and Reheating
- Refrigerator: Store the cooked chicken separately from the lettuce and ranch for up to 3 days. Assembled wraps soften fast, so build them fresh if you want the best texture.
- Freezer: The breaded chicken freezes well after cooking. Freeze it in a single layer, then reheat from frozen in the oven or air fryer; don’t freeze the fully assembled wrap because the lettuce and ranch won’t recover.
- Reheating: Reheat the chicken in a 375°F oven or air fryer until hot and crisp again. Avoid the microwave if you want to keep the breading intact, since it turns the crust soft before the center is fully warm.
Questions I Get Asked About This Recipe
Crispy Chicken Bacon Ranch Wrap
Ingredients
Equipment
Method
- Soak the chicken in buttermilk for 15 minutes. This helps the coating stick so you get a crisp crust.
- Dredge the soaked chicken in a mixture of panko breadcrumbs, Parmesan cheese, garlic powder, salt, and pepper. Press lightly so the crumbs adhere evenly.
- Warm the flour tortillas until pliable. Keep them covered so they don’t dry out while you cook the chicken.
- Heat olive oil in a skillet over medium-high heat. Cook the breaded chicken for 4-5 minutes per side until golden and cooked through to 165°F.
- Remove the chicken and slice it into strips. Keep it crisp while you assemble the wraps.
- Spread ranch dressing across each tortilla. Aim for an even layer so every bite has ranch.
- Layer shredded romaine lettuce, cherry tomatoes, shredded cheddar cheese, cooked crispy bacon, and sliced crispy chicken over the ranch. Distribute fillings so the wrap holds together when rolled.
- Roll the tortilla tightly and set seam-side down in the skillet. Toast for 2 minutes per side until golden.
- Slice the wraps diagonally and serve with extra ranch. Cut to show the crisp, layered cross-section.