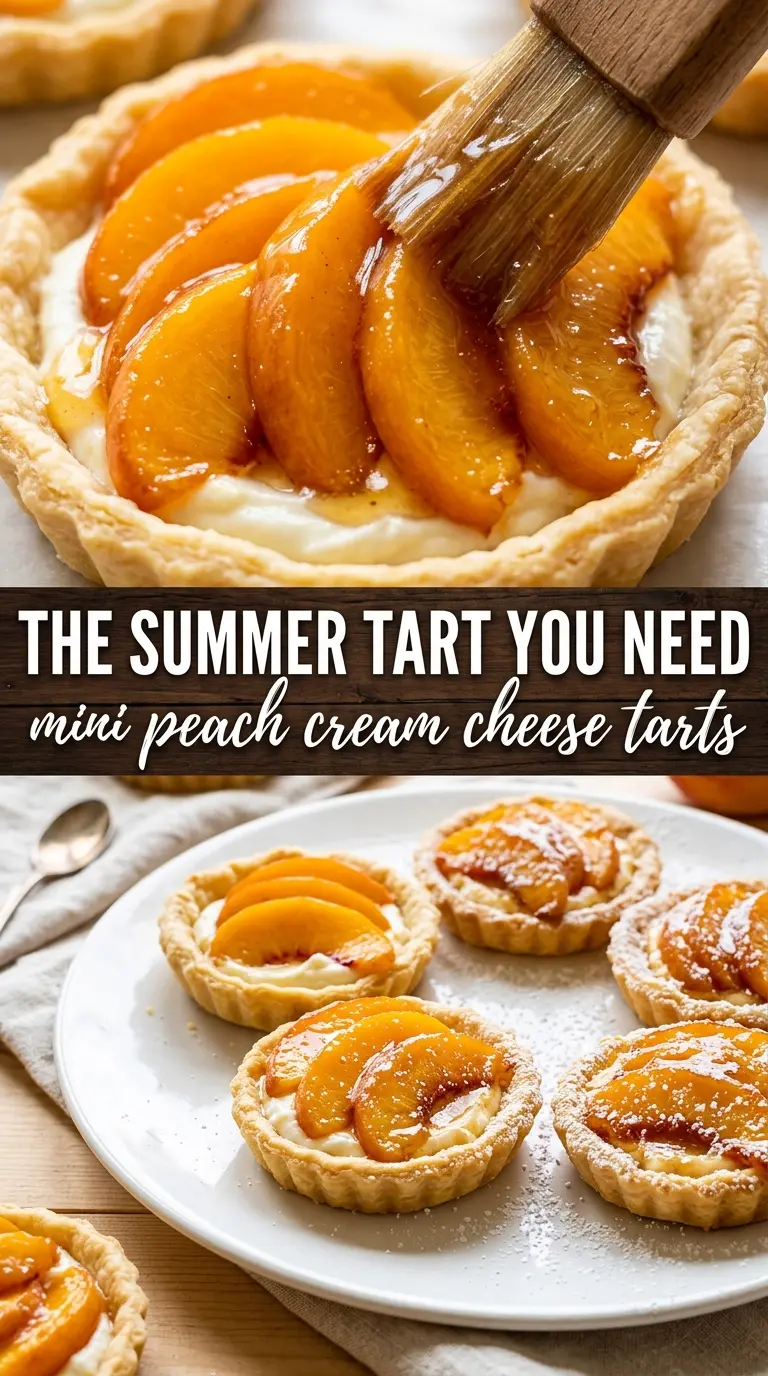
Tiny tart shells, a smooth cream cheese filling, and ripe peach slices make these mini peach cream cheese tarts the kind of dessert that disappears before the platter hits the table. The contrast is the whole point: crisp phyllo, cool and fluffy filling, soft fruit, and a glossy finish that keeps each bite looking polished instead of messy.
What makes this version work is the balance. The shells get a short bake first so they stay crisp under the filling, and the cream cheese mixture is whipped until it’s light enough to pipe neatly without tearing the shells. A little lemon zest keeps the filling from tasting flat, and the jam or honey glaze gives the peaches shine while helping them stay in place.
Below, I’ll show you the small details that matter most, including how to keep the shells crisp, how to get a smooth filling, and the easiest way to make them look like you spent a lot more time on them than you did.
The shells stayed crisp after chilling, and the peach glaze made them look bakery-level. I piped the filling with a zip-top bag and it was neat and fast.
Like these mini peach cream cheese tarts? Save them to Pinterest for the crisp phyllo shells, silky filling, and glossy peach topping that make them party-ready.
The trick is keeping the phyllo shells crisp under the filling
Mini phyllo shells are convenient, but they’re also the first thing to go soft if you rush the assembly. That short five-minute bake matters because it dries out the shell just enough to hold up under the cream cheese without turning chewy. Let them cool completely before filling; if the shells are even slightly warm, the filling softens and the bottoms lose their snap.
The other place people run into trouble is overfilling. A generous swirl looks pretty, but if the filling rises above the rim, the peach slices slide around and the glaze runs off the sides instead of staying on top. Pipe the filling so it sits just below the edge of the shell, then press the peaches in gently so they anchor without sinking.
What Each Ingredient Is Actually Doing in This Peach Dessert
- Peaches (ripe, quality fruit) — Ripeness is critical. Ripe peaches are sweeter and more flavorful. Use perfectly ripe fruit.
- Sugar or sweetener (brown or white) — This complements natural peach sweetness. Don’t oversweeten or peach flavor disappears.
- Flour or crust base (pie crust, pastry, or cake) — This provides structure. Choose based on dessert type.
- Butter or fat (richness and moisture) — This adds flavor and prevents dryness. Don’t skip the fat.
- Acid (lemon juice or vinegar) — This brightens peach flavor and prevents one-dimensional sweetness.
- Spices (cinnamon, nutmeg, or ginger) — These complement peach flavor without overpowering it.
- Eggs (if cake-based, the binder) — These hold ingredients together and add structure.
- Cream cheese or frosting (optional, the complement) — This adds richness and balances peach sweetness.
What each ingredient is actually doing in these tartlets
- Mini phyllo tart shells — These give you the crisp, delicate base without rolling dough or blind-baking. A standard store-bought phyllo shell works best here because it stays light and shatters cleanly under the filling; a graham crust would be too crumbly for these tiny tarts.
- Cream cheese — Full-fat cream cheese gives the filling body and that tangy, chilled cheesecake texture. Low-fat cream cheese will work in a pinch, but it tends to taste thinner and can look a little loose once piped.
- Powdered sugar — This sweetens the filling without leaving graininess behind. Granulated sugar won’t dissolve as smoothly, which is why the texture can feel sandy if you swap it in straight.
- Lemon zest — This keeps the filling from tasting heavy. The zest does more than brighten the flavor; its oils cut through the richness, so don’t skip it if you want the peaches to taste more vibrant.
- Peach jam or honey — This is the finishing glaze that gives the fruit shine and a little stickiness so it stays put. Jam makes a thicker, more polished coating, while honey gives a lighter gloss and a softer sweetness.
- Fresh peaches — Use ripe but still firm peaches so the slices hold their shape. If they’re too soft, they’ll slump in the cream cheese and weep juice onto the shells.
Building the tarts so the peaches stay pretty
Warming the shells first
Start by baking the mini phyllo shells just until they look a shade deeper and feel crisp to the touch. That quick bake pulls out enough moisture to help them hold the filling, and it also gives the tarts a fresher, less stale flavor than using the shells straight from the package. Let them cool on the pan, not stacked, so steam doesn’t collect underneath and soften them.
Whipping the filling until it pipes cleanly
Beat the cream cheese, powdered sugar, vanilla, and lemon zest until the mixture turns smooth and aerated. If it still looks lumpy, keep going; lumps won’t disappear once it’s piped, and they make the filling look heavy. A piping bag gives the neatest finish, but a zip-top bag with the corner snipped works just as well if you keep the pressure steady.
Finishing with fruit and glaze
Slice the peaches thin enough that they can bend slightly when pressed into the filling, then arrange them in one or two slices per tart. Whisk the jam with warm water until it brushes on easily; if it’s too thick, it will clump on the fruit instead of coating it. Chill the finished tarts for about 30 minutes so the glaze sets and the filling firms up, then add the thyme right before serving for the cleanest look.
How to adapt these peach tartlets for different kitchens and crowds
Dairy-free filling with whipped coconut cream cheese
Use a dairy-free cream cheese that’s meant for spreading, not a very soft whipped tub version. It pipes best after a short chill, but the texture will be a little less tangy and a little softer than the original.
Gluten-free by design
These tarts are already gluten-free if you use certified gluten-free mini phyllo shells. Check the package carefully, since some store-bought shells are made in shared facilities even when the ingredient list looks fine.
Swap peaches for nectarines or apricots
Nectarines give you the same clean slices without peeling, and apricots bring a brighter tartness. Both work best when they’re ripe but still firm, or they’ll slump under the glaze and make the tartlets look watery.
Make-ahead for a party
Bake the shells and mix the filling up to a day ahead, then store them separately. Assemble a few hours before serving so the shells stay crisp; once the peaches and glaze go on, the clock starts ticking on texture.
Storage and Reheating
- Refrigerator: Store assembled tarts for up to 2 days. The shells soften after a few hours, so they’re best the day they’re made.
- Freezer: Don’t freeze the finished tarts. The peaches turn mushy and the cream cheese filling loses its smooth texture once thawed.
- Reheating: These are served cold, not reheated. If you want to refresh them, chill them well before serving and add the thyme at the last minute so it stays bright.
Answers to the questions worth asking

Mini Peach Cream Cheese Tarts
Ingredients
Equipment
Method
- Bake the mini phyllo tart shells at 350°F for 5 minutes until lightly crisped, using a sheet pan. Let them cool completely so the filling won’t loosen the crust.
- Beat the cream cheese, powdered sugar, vanilla extract, and lemon zest until very smooth and fluffy. Stop and scrape the bowl as needed for an even texture.
- Transfer the filling to a piping bag or a zip-lock bag with a corner snipped. Pipe a generous swirl of cream cheese filling into each cooled tart shell.
- Press one or two thin peach slices gently into the cream cheese on each tart. Keep the slices thin for a neat, glossy top.
- Whisk peach jam with warm water until pourable, then brush or drizzle over each tart. Refrigerate the tarts for 30 minutes to set.
- Garnish with fresh thyme sprigs just before serving for a bright herbal finish. Serve chilled.