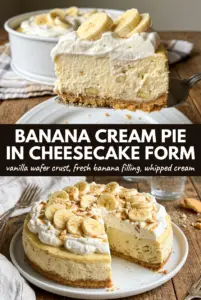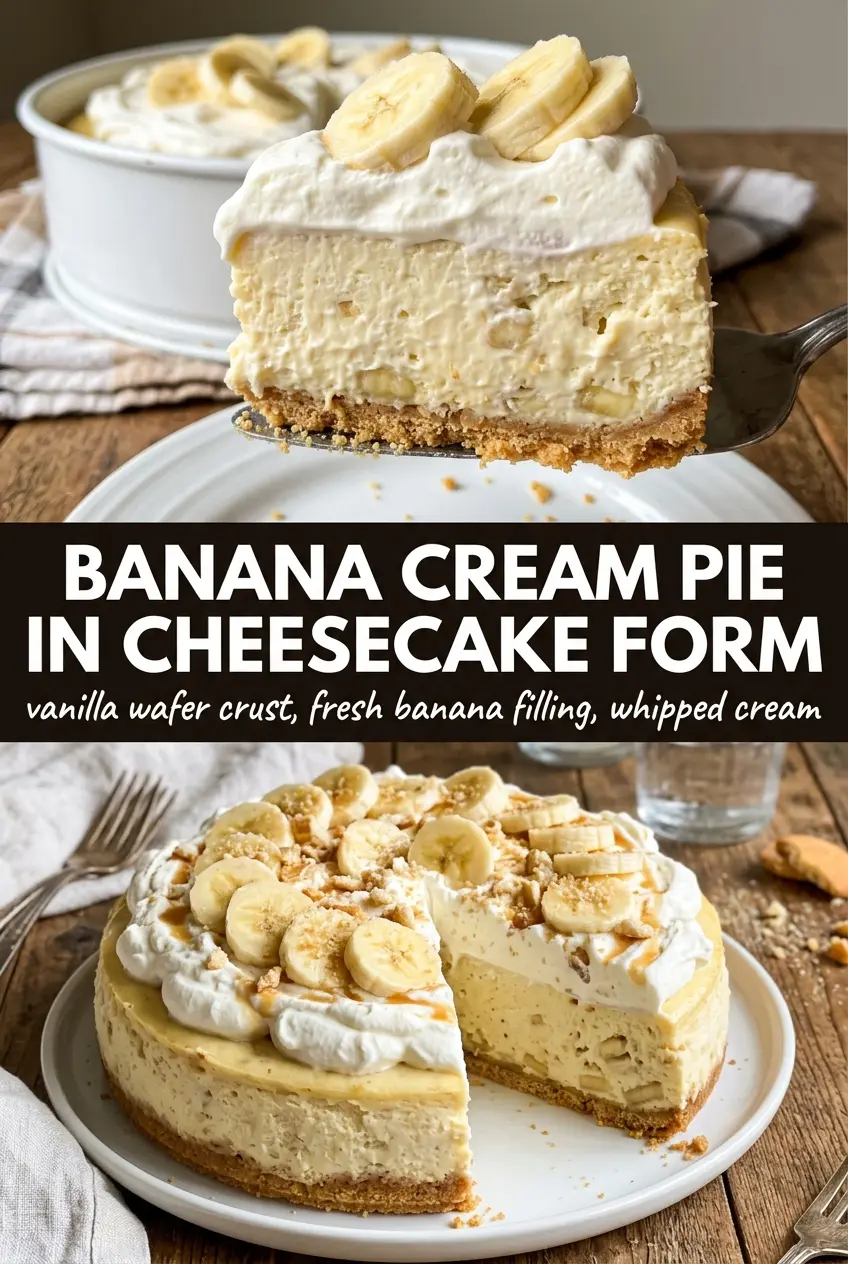
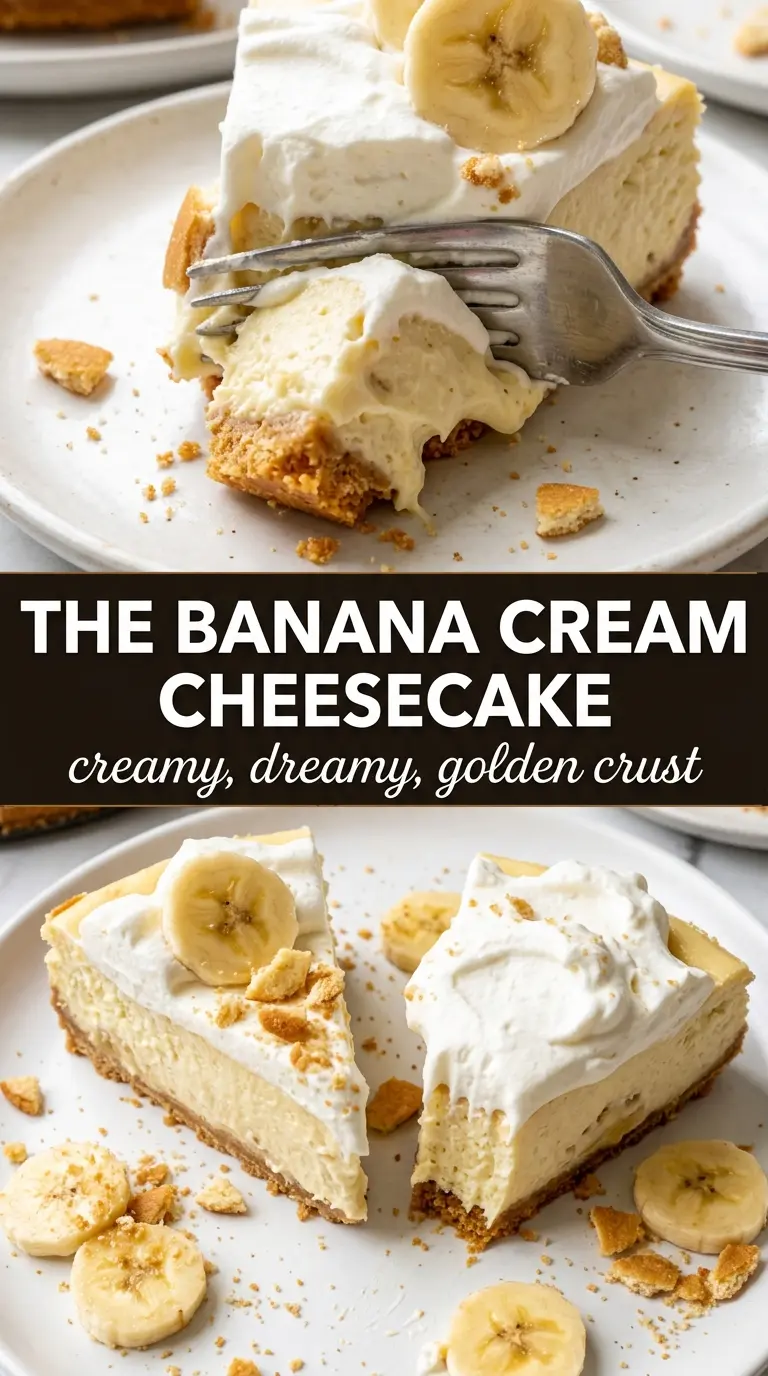
Banana cream cheesecake hits that sweet spot between nostalgic and polished: a buttery vanilla wafer crust, a cold, silky banana filling, and just enough whipped topping to keep every bite light instead of heavy. The bananas stay front and center, but the cheesecake texture gives the whole dessert a cleaner slice and a richer finish than banana pudding alone.
What makes this version work is the balance between the cream cheese and the instant pudding mix. The cream cheese brings body, the sweetened condensed milk adds sweetness without thinning the filling, and the dry pudding mix helps everything set up without baking. Folding in the whipped topping at the end keeps the filling airy, but only if the cream cheese base is smooth first — any lumps at that stage will stay lumps.
Below, I’ve included the little details that matter most: how to keep the crust compact, when to add the bananas so they don’t sink, and the best way to slice this cleanly after chilling. It’s the kind of dessert that looks like you planned ahead, even though the active work takes just a few minutes.
The filling set up beautifully after overnight chilling, and the banana slices in the middle stayed fresh instead of turning mushy. The vanilla wafer crust held together cleanly when I sliced it.
Love the silky banana filling and vanilla wafer crust? Save this Banana Cream Cheesecake for the next time you want a no-bake dessert that slices cleanly and chills into a perfect set.
The Part That Keeps This No-Bake Cheesecake From Going Soft
The biggest mistake with a banana cream cheesecake is rushing the filling before the base is smooth enough. If the cream cheese still has tiny cold bits, the pudding mix won’t blend evenly and you’ll end up with a grainy texture that never quite disappears. Room-temperature cream cheese matters here more than anywhere else in the recipe.
The other thing that keeps this dessert solid is the chill time. A no-bake cheesecake doesn’t firm up because of heat; it firms up because the pudding hydrates, the cream cheese chills, and the whipped topping gives the filling structure. Pulling it too early leaves you with a soft center that slumps when sliced.
- Vanilla wafers — They give the crust its classic banana pudding flavor and a fine, sandy crunch that presses into a sturdy base. Graham crackers work in a pinch, but they lose that nostalgic banana-cream connection.
- Sweetened condensed milk — This adds sweetness and body at the same time. Regular milk or cream won’t give the filling the same density or smooth finish.
- Instant banana pudding mix — This does the setting work and brings the banana flavor without thinning the filling. Use instant, not cook-and-serve; the cook-and-serve version won’t thicken the same way in a no-bake dessert.
- Whipped topping — It lightens the filling and helps it hold its shape after chilling. Fresh whipped cream works too, but it softens faster and won’t stay quite as stable overnight.
What Each Layer Is Doing in the Bowl
- Cream cheese — This is the backbone of the filling. Let it soften fully so it beats smooth before anything else goes in; otherwise the pudding mix can’t disguise the lumps.
- Cold whole milk — A little cold milk helps activate the instant pudding mix without making the filling loose. Skim milk can work, but whole milk gives a richer, fuller finish.
- Bananas — Use ripe bananas with plenty of brown speckles for the best flavor. Slice them just before layering so they don’t brown too quickly, and keep them in a single layer so each bite gets some fruit without the cheesecake turning watery.
- Whipped topping — Fold it in gently, not aggressively. If you beat it in, you’ll knock out the air and the filling will feel dense instead of creamy.
Building the Crust and Filling Without Losing the Set
Pressing the Crust Firmly
Mix the crushed vanilla wafers with melted butter and sugar until every crumb looks evenly moistened, then press it firmly into the bottom of the springform pan. A loose crust falls apart when you slice, so use the bottom of a measuring cup or glass to pack it down with real pressure. Chill it for 20 minutes so the butter can firm back up before the filling goes on.
Whipping the Base Until It’s Smooth
Beat the softened cream cheese first and stop only when it looks completely smooth and fluffy, with no visible lumps. Add the sweetened condensed milk, pudding mix, and cold milk next, then beat just until the mixture thickens and looks glossy. If you keep whipping after it thickens, you can loosen the structure you just built.
Layering the Bananas the Right Way
Spread half the filling over the crust, then arrange the banana slices in a single layer before adding the rest. That middle layer keeps the bananas from all sinking to the bottom, where they can turn soft and muddy-looking. Smooth the top gently with an offset spatula or the back of a spoon so you don’t pull the banana layer up into the surface.
Chilling Until the Slice Holds
Refrigerate the cheesecake for at least 6 hours, but overnight gives you the cleanest slice. The filling needs time to firm from the inside out, and the center should feel set when you lightly tap the pan. Add the whipped cream topping, extra banana slices, and caramel drizzle right before serving so the finish stays fresh.
How to Adapt This for Different Kitchens and Different Crowds
Make it gluten-free
Swap the vanilla wafers for a gluten-free vanilla cookie or gluten-free graham-style cracker. Keep the butter amount the same and press the crust firmly, since some gluten-free crumbs stay a little more fragile and need extra compaction to hold together.
Use fresh whipped cream instead of whipped topping
You can fold in an equal amount of softly whipped cream if you want a cleaner dairy flavor and don’t mind a slightly softer set. The texture stays lighter, but it won’t hold as long in the fridge, so this version is best served within a day.
Turn it into banana pudding bars
Line an 8×8 or 9×9 pan with parchment, build the crust, and spread the filling in a square pan instead of a springform. You’ll get easier serving for potlucks, though the slices won’t have quite the same tall cheesecake look.
Storage and Reheating
- Refrigerator: Store covered for up to 4 days. The bananas will soften a bit over time, but the cheesecake still slices well the first 2 days.
- Freezer: Freeze individual slices without the whipped topping garnish for up to 1 month. Thaw in the refrigerator overnight; the texture softens a little, but it still tastes great for a chilled dessert.
- Reheating: No reheating needed. Serve it cold straight from the fridge, and don’t leave it on the counter too long or the filling will lose its set.