Tri-tip earns its place in the rotation because it gives you a deep, seasoned crust and a rosy center without the long, slow commitment of a bigger roast. Sliced against the grain, it stays tender and beefy, with enough char on the outside to make every bite feel intentional. It’s the kind of main dish that looks like you worked much harder than you did.
The trick is in the balance: a generous dry rub, a quick rest at room temperature, and high heat to build that crust before the meat cooks past medium-rare. Tri-tip is a triangular cut with a grain that changes direction, so the final slice matters just as much as the cook. Get that right and you’ll have juicy slices instead of chewy ones.
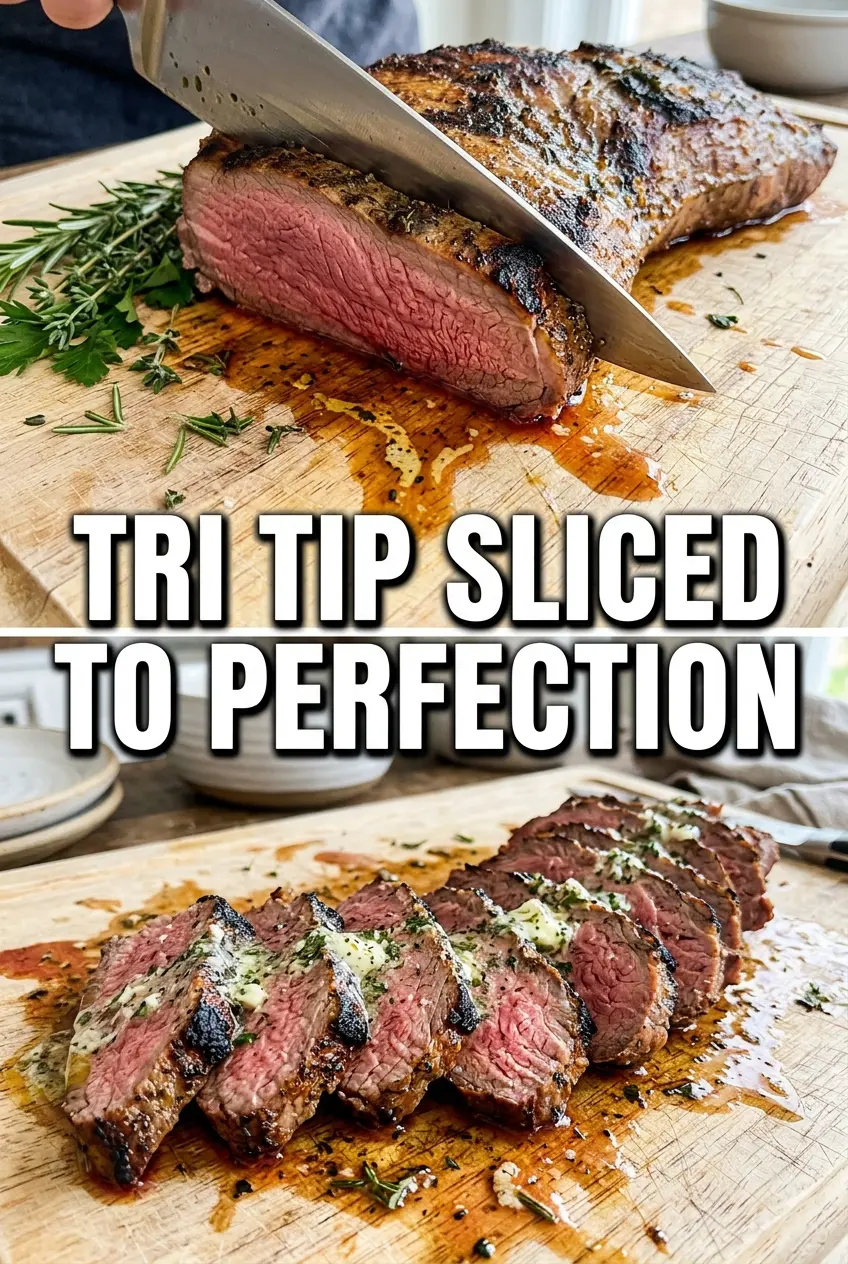
The crust came out beautifully and the center stayed pink all the way through. I did the oven method and the 15-minute rest made it slice like a dream.
Save this grilled-or-oven-roasted tri-tip for the nights when you want a crisp spice crust and a medium-rare center without fuss.
The Cut Slices Tender Only If You Respect the Grain
Tri-tip is one of those cuts that punishes casual slicing. The muscle fibers run in different directions across the roast, and if you cut straight through them without paying attention, the meat eats tougher than it should. The good news is that the roast itself does most of the work; your job is to notice where the grain changes and slice across it, not with it.
The other common failure is overcooking. Tri-tip shines at medium-rare to medium, which gives you a pink center and enough juiciness to carry the seasoning. Pull it when the thickest part hits 130-135°F, then rest it before cutting so the juices stay in the meat instead of running across the board.
What the Rub Is Doing Before the Heat Hits
- Kosher salt — This is the part that seasons the meat all the way through, not just the surface. Use kosher salt if you can, because it distributes more evenly than table salt and gives you better control over the crust.
- Black pepper, garlic powder, paprika, onion powder, and dried oregano — Together, they build that Santa Maria-style beefy, savory shell. Paprika helps with color, garlic and onion add depth, and oregano keeps the rub from tasting flat.
- Olive oil — The oil helps the rub cling and promotes browning. You don’t need much; too much oil can turn the exterior slick instead of crusty.
If you only swap one thing, keep the salt and pepper ratio close. The rest can flex a little, but the seasoning has to be bold enough to stand up to the size of the roast.
The High-Heat Window That Gives You the Crust
Mixing and Coating the Roast
Stir the rub together first so the seasoning goes on evenly instead of in patches. Coat the tri-tip with olive oil, then press the rub onto every surface until it looks fully covered. Let it sit at room temperature for about 30 minutes; that short rest helps the center cook more evenly, and it also gives the salt time to start working on the surface.
Grilling Over Direct and Indirect Heat
Start over high heat to sear both sides for about 5 minutes each. You want a dark crust and some charring at the edges, not a slow cook from the start. After that, move the roast to indirect heat and close the lid until the center reaches 130-135°F for medium-rare. If the outside is dark before the center comes up to temp, drop the heat a little and let indirect cooking finish the job.
Oven-Roasting After a Hot Sear
For the oven method, sear the tri-tip in a hot skillet first. That first blast of heat builds the crust before the roast goes into the oven at 425°F. Roast until the center hits 130-135°F, usually 20-25 minutes depending on thickness. If you skip the sear, the roast still cooks, but it loses the browned exterior that makes tri-tip taste like tri-tip.
The Rest and the Slice
Let the roast rest for 15 minutes before slicing. That pause keeps the juices from spilling out the second your knife touches it. Find the grain, turn the roast if needed, and slice against it into thin strips. If the slices look stringy, the usual culprit is cutting with the grain, not the cooking method.
How to Adapt This Tri-Tip for Different Cooktops and Eaters
Gluten-Free Without Changing the Method
This recipe is naturally gluten-free as written, so nothing needs to be swapped. Just check your spice labels if you use pre-mixed seasonings, since some blends hide anti-caking agents or fillers that aren’t worth the trouble.
Less Salty, Still Well-Seasoned
If you’re sensitive to salt, cut the kosher salt back a little, but don’t strip it out. Salt is carrying the flavor across a big roast, and if you reduce it too much the beef tastes bland no matter how much garlic and paprika you add.
No Grill, All Oven
The oven method gives you the same pink center and a very good crust if you start with a hot skillet. The skillet sear matters here; it’s what keeps the exterior from looking pale and one-note once the roast finishes in the oven.
Smokier, More Santa Maria Style
If you want a more classic Santa Maria feel, add a little extra black pepper and serve it with grilled onions or beans. Keep the seasoning simple and bold; tri-tip doesn’t need a long ingredient list to taste like a proper barbecue roast.
Storage and Reheating
- Refrigerator: Store sliced tri-tip in an airtight container for up to 4 days. It stays juicy if you keep the slices with any collected juices.
- Freezer: It freezes well for up to 2 months. Wrap portions tightly and thaw in the refrigerator so the meat doesn’t dry out.
- Reheating: Reheat gently in a covered skillet with a splash of beef broth or in a low oven until just warmed through. High heat pushes the meat past medium-rare and makes the slices dry and gray.
Answers to the Questions Worth Asking
Tri Tip - Grilled or Oven-Roasted
Ingredients
Equipment
Method
- In a small bowl, mix kosher salt, black pepper, garlic powder, paprika, onion powder, and dried oregano until evenly combined.
- Pat the tri-tip roast dry so the oil and rub will cling for a crusty exterior.
- Brush the tri-tip roast with olive oil, then coat generously with the spice rub to form an even layer.
- Let the tri-tip sit at room temperature for 30 minutes so the seasoning penetrates slightly.
- Sear the tri-tip over high heat for 5 minutes per side to develop a browned crust.
- Move to indirect heat and cook until the internal temperature reads 130-135°F for medium-rare, using a quick check for accuracy.
- Sear the tri-tip in a hot cast iron skillet until browned, then transfer to a sheet pan.
- Roast at 425°F for 20-25 minutes until the internal temperature reads 130-135°F for medium-rare.
- Rest the tri-tip for 15 minutes before slicing so juices redistribute and the center stays pink.
- Slice against the grain and serve, showing the crusty seasoned exterior and medium-rare interior.