Crispy honey pepper chicken hits the table with the kind of sticky, glossy glaze that clings to every ridge of the breading instead of sliding off into the bowl. The chicken stays light and crunchy under the sauce, and the black pepper cuts through the honey so each bite lands sweet, savory, and sharp all at once. It’s the kind of dinner that disappears fast, especially when it’s spooned over hot rice.
What makes this version work is the double coating of flour and cornstarch. That combination fries up with a drier, craggier crust than flour alone, which gives the sauce something to grab onto. The sauce itself only needs a short simmer; if you cook it too long, the honey can turn thick and sticky before the pepper has a chance to bloom. A little butter rounds out the edges, while apple cider vinegar keeps the glaze from tasting flat.
Below, you’ll find the timing that keeps the chicken crisp, the ingredient choices that matter most, and a few smart swaps for when you want to adjust the heat or make it work with what’s already in your kitchen.
The chicken stayed crisp even after tossing it in the sauce, and the cracked black pepper gave it that takeout-style bite without making it too sweet. I served it over rice and the sauce soaked in just enough to coat everything without turning mushy.
Save this crispy honey pepper chicken for the nights when you want sticky glaze, crunchy coating, and bold black pepper over rice.
The Crunch Comes From the Coating, Not the Fry
The biggest mistake with chicken strips like this is rushing the coating or crowding the pan. The flour-cornstarch mix needs to cling in an even layer so it can fry into a crisp shell, and the oil has to stay hot enough to set that crust before the chicken starts soaking up grease. If the oil drops too much, the breading turns pale and heavy instead of crisp.
For this recipe, the goal is a dry, golden exterior with enough texture to hold the glaze for a few minutes without collapsing. That means patting the chicken dry before dredging, frying in batches, and draining it briefly on paper towels before it goes into the sauce. You’re not trying to keep it hot and naked for long. You’re building a crust that can handle being coated.
- Chicken breast strips — Cutting the chicken into even strips helps every piece cook at the same rate. Thin, uneven pieces overcook fast, so keep the strips close in size.
- Cornstarch — This is what gives the crust its lighter, crispier bite. Flour alone works, but it won’t stay as shattery under the glaze.
- Cracked black pepper — Freshly cracked pepper matters here. Fine pepper blends into the sauce instead of standing out, while coarse pepper gives you that bold, visible bite.
- Apple cider vinegar — A small amount keeps the honey from tasting one-note. If you only have rice vinegar, use it in the same amount for a cleaner finish.
What Each Part of the Sauce Is Doing

- Honey — This is the body of the glaze, but it also burns easily if the heat is too high. Use standard grocery-store honey here; the sauce doesn’t need anything fancy.
- Soy sauce — It pulls the sweetness back and gives the glaze a deeper color. Low-sodium soy sauce works fine if that’s what you keep on hand.
- Butter — A tablespoon softens the edges and gives the sauce a smoother finish. Don’t skip it unless you need a dairy-free version.
- Coarse cracked black pepper — This is the signature flavor, so don’t swap in a tiny pinch of fine pepper and expect the same result. The sauce should look speckled.
- Red pepper flakes — These don’t make the dish hot-hot; they just add a small amount of heat that keeps the glaze from tasting flat. Leave them out if you want a milder chicken.
Frying the Chicken, Then Glazing It Fast
Coat and Set the Chicken
Toss the chicken strips until every surface is dusted, then shake off the excess so the coating stays light. If the flour layer looks thick or gummy before frying, it’ll fry up pasty instead of crisp. Let the coated chicken sit for a couple of minutes while the oil heats; that brief rest helps the coating hydrate and cling better.
Fry in Hot Oil
Heat about an inch of oil to 375°F and fry the chicken in batches for 3 to 4 minutes per side, until the crust is deep golden and the centers are cooked through. If the oil temperature swings too low, the chicken will absorb grease and lose its crunch. Keep the pieces moving gently so they don’t stick together, then drain them briefly while you finish the sauce.
Simmer the Sauce Until It Glosses
Combine the honey, soy sauce, butter, vinegar, pepper, garlic powder, and red pepper flakes in a small saucepan over medium heat. Once it starts to bubble, let it simmer for just a few minutes until it thickens slightly and smells peppery and warm. If it goes too long, it will get sticky fast and won’t coat the chicken evenly, so pull it the moment it turns glossy and lightly syrupy.
Toss and Serve Right Away
Add the fried chicken to the sauce and toss fast, just until every piece is coated. The goal is a shiny glaze, not a soak. Serve it immediately over steamed rice and finish with green onions, because the fresh bite keeps the dish from feeling heavy.
How to Adapt This for Different Kitchens and Diets
Make It Dairy-Free
Swap the butter for a neutral oil or a dairy-free butter substitute. You’ll lose a little of the roundness that butter brings, but the honey, soy sauce, and pepper still carry the sauce well.
Make It Gluten-Free
Use a gluten-free all-purpose flour blend in place of the flour and swap in tamari for the soy sauce. Cornstarch stays the same, and the crust still fries up crisp as long as you don’t overload the pan.
Bake Instead of Fry
Arrange the coated chicken on a greased rack set over a baking sheet and bake at 425°F until cooked through and lightly crisp, about 18 to 22 minutes. The coating won’t be as craggy as the fried version, but it still holds the sauce well if you glaze it right before serving.
Turn Up the Heat
Add another 1/4 teaspoon of red pepper flakes or a pinch of cayenne to the sauce. That gives the glaze a sharper edge without changing the sweet-savory balance that makes the dish work.
Storage and Reheating
- Refrigerator: Store leftovers in an airtight container for up to 3 days. The coating softens once it sits in sauce, but the flavor stays strong.
- Freezer: You can freeze the cooked chicken before saucing, then thaw and re-crisp it in the oven or air fryer. Once it’s coated in sauce, freezing turns the crust soft and sticky in a way that doesn’t recover well.
- Reheating: Warm the chicken in a 375°F oven or air fryer until hot, then add a fresh spoonful of sauce if needed. Microwaving straight from the fridge makes the coating soggy fast, so use dry heat first if you want any crunch left.
Answers to the Questions Worth Asking
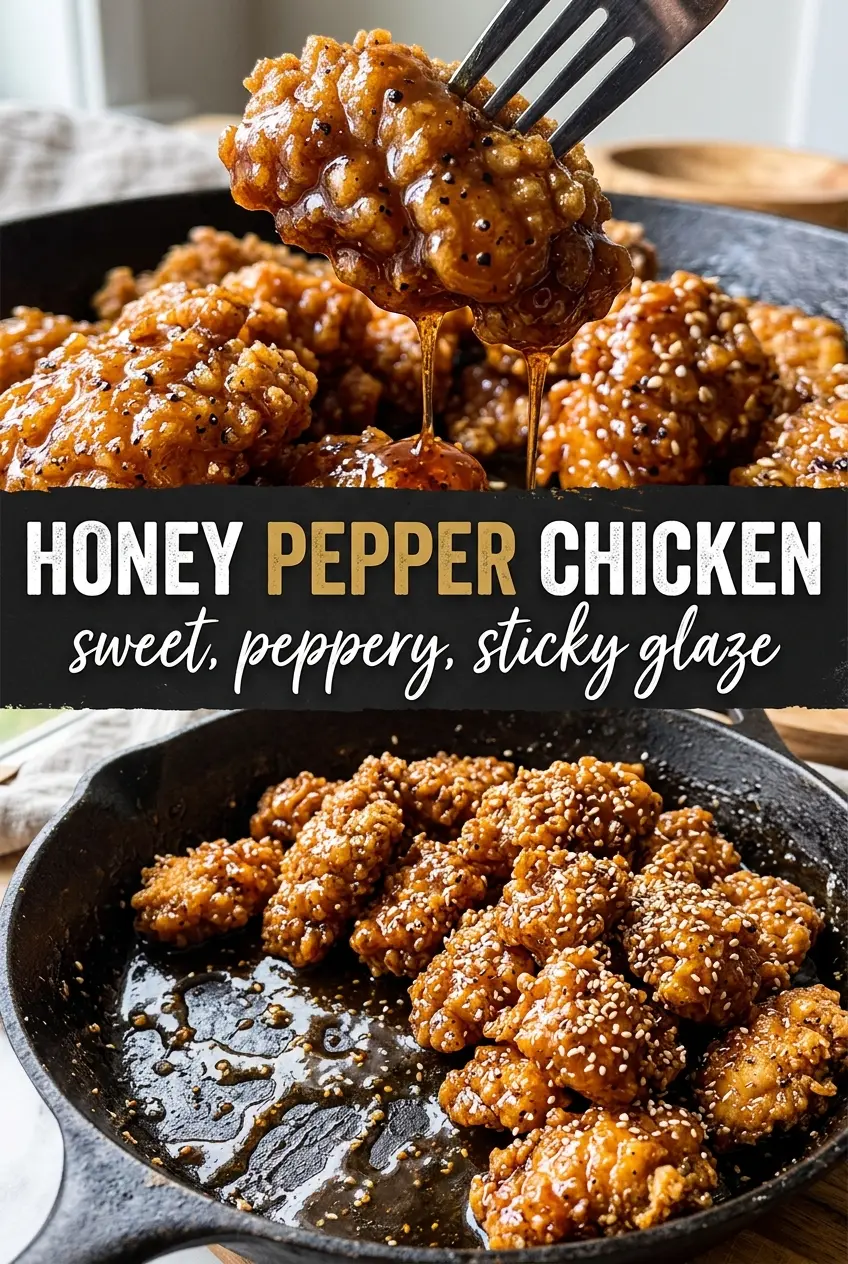
Honey Pepper Chicken
Ingredients
Equipment
Method
- Toss the chicken strips with the all-purpose flour, cornstarch, salt, and pepper until evenly coated and no dry bits remain.
- Heat vegetable oil to 375°F in a cast iron skillet and fry the coated chicken in 1 inch of oil for 3-4 minutes per side, until deep golden and cooked through.
- Transfer the fried chicken to a sheet pan and drain on paper towels to remove excess oil before glazing.
- Combine honey, soy sauce, butter, apple cider vinegar, coarse cracked black pepper, garlic powder, and red pepper flakes in a small saucepan over medium heat.
- Simmer for 3-4 minutes until slightly thickened and the pepper flavors bloom, creating a glossy, amber-tinged sauce.
- Toss the crispy chicken in the honey pepper sauce until every piece is fully glazed and coated with visible pepper.
- Serve the glazed honey pepper chicken over steamed rice and garnish with sliced green onions.