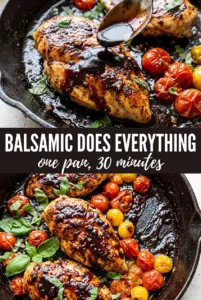
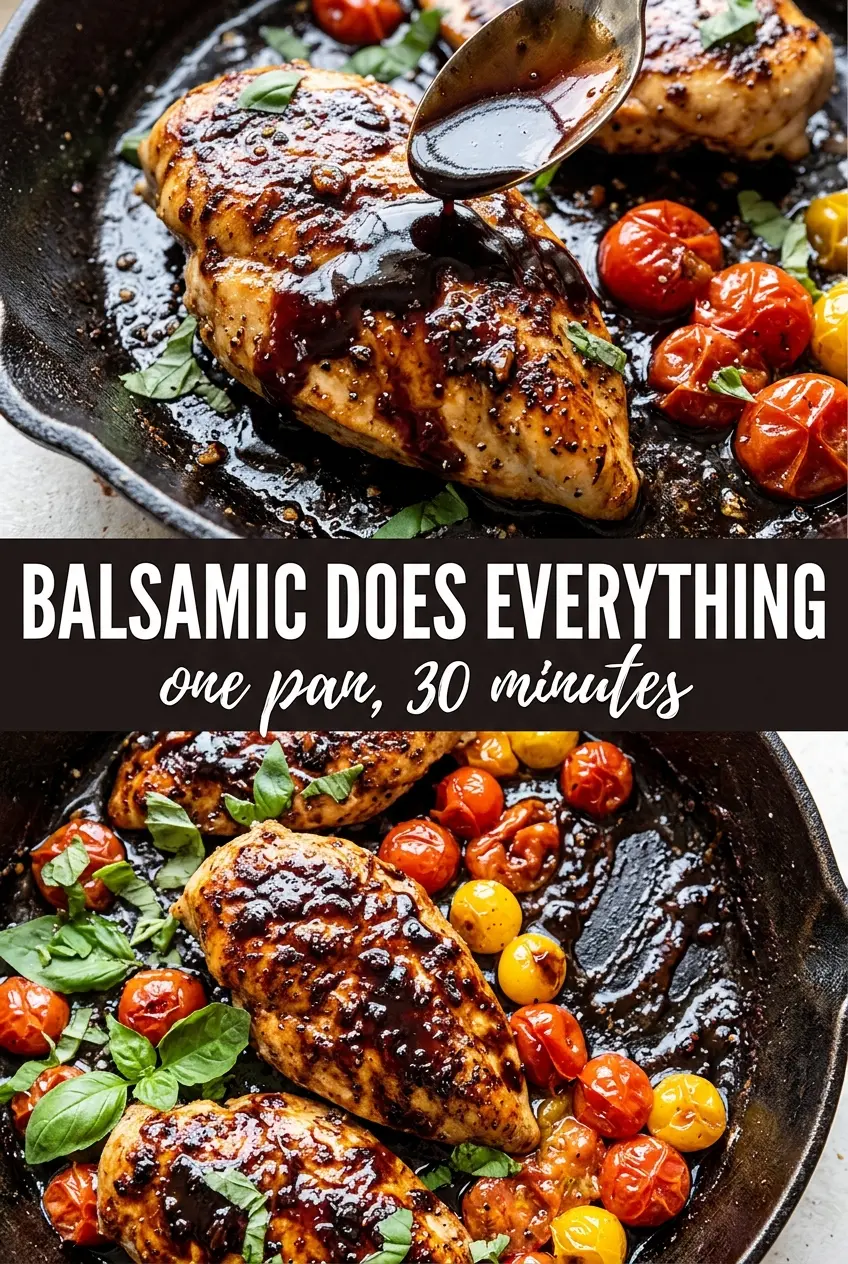
Golden chicken thighs, blistered tomatoes, and a balsamic glaze that turns glossy and sticky in the skillet are what make this one-pan chicken worth putting on repeat. The skin stays crisp where it meets the pan, the sauce gets deep and caramelized without tasting sharp, and the whole dish finishes with the kind of pan sauce that begs for bread or rice.
The trick is starting with bone-in, skin-on thighs and giving them enough time to render properly before anything liquid goes in. Once the vinegar, honey, and broth hit the pan, the browned bits from the chicken become the base of the sauce instead of getting left behind. That’s where the depth comes from, and that’s also why this version tastes cooked with care instead of just poured together.
Below, I’ve broken down the parts that matter most: how to get the skin crisp, why the balsamic mixture behaves the way it does, and what to change if you need a lighter hand with the sweetness. If you’ve ever had balsamic chicken come out dull, thin, or a little harsh, the fix is in the details here.
The sauce reduced into this glossy glaze right in the pan, and the chicken skin stayed crisp even after I spooned the balsamic over it. My husband kept sneaking bites of the tomatoes before dinner was even plated.
Love the dark, glossy finish on this one pan balsamic chicken? Save it to Pinterest for the nights when you want crisp chicken thighs and a pan sauce that comes together fast.
The Step That Keeps the Sauce Glossy, Not Watery
The biggest mistake with balsamic chicken is rushing the reduction after the liquid goes in. If the heat stays too low, the vinegar tastes sharp and the sauce stays thin. If it’s too high for too long, the honey can go from caramelized to bitter before the chicken finishes cooking. Medium heat gives the glaze time to thicken while the chicken stays tender.
Skin-on thighs matter here because they bring fat to the pan and stand up to a longer finish in the sauce. That fat helps build flavor, but only if you give the skin a proper sear first. If the chicken sticks when you try to turn it, it isn’t ready yet. Leave it alone another minute and it will release cleanly.
- Chicken thighs — Bone-in, skin-on thighs are the right cut here because they stay juicy while the sauce reduces. Boneless thighs work in a pinch, but you’ll lose some of the richness the skin and bone bring to the skillet.
- Balsamic vinegar — Use a balsamic you’d actually want to taste on its own. A harsh, cheap bottle can turn the glaze sour instead of balanced.
- Honey — This softens the acidity and helps the sauce cling to the chicken. Maple syrup works if that’s what you have, but it will taste a little less round and a little more woodsy.
- Chicken broth — Broth keeps the glaze from becoming sticky before the chicken is cooked through. Water will work in a real pinch, but the sauce will taste flatter.
- Butter — Stirring in butter at the end gives the glaze that satin finish and smooths out the sharp edges. Add it off the heat if the sauce is already very thick so it doesn’t split.
What Each Ingredient Is Actually Doing in This Chicken Dish

- Chicken (pat dry for browning) — Room temperature cooks more evenly. Even pieces ensure uniform doneness.
- Oil or butter (the browning medium) — High-heat oil essential for proper searing. Creates pan flavor.
- Seasonings (salt, pepper, spices) — Apply generously. Chicken carries the entire flavor profile.
- Aromatics (garlic, ginger, herbs) — Cook with fat to bloom flavors. Become the foundation.
- Sauce or braising liquid (if using) — This keeps chicken moist. Balance richness with acid.
- Vegetables (if using) — Layer by cooking time so everything finishes together.
- Acid (vinegar, wine, lime, or pineapple) — This brightens and prevents one-dimensional flavor.
- Proper doneness (165°F internal temperature) — Use thermometer for accuracy. Overcooked is dry.
Getting the Sear and Glaze Right in One Skillet
Seasoning the Chicken Well
Season both sides generously before the skillet goes on the heat. The chicken should look evenly coated, not dusty, and the seasoning should cling to the skin. This is the only chance to season the meat itself before the glaze takes over, so don’t hold back. If the chicken is wet when it hits the pan, the skin steams and the sear suffers.
Building the Crisp Skin
Set the thighs skin-side down in hot olive oil and let them cook without moving them for 7 to 8 minutes. You’re looking for a deep golden crust that releases easily from the pan, not pale skin with a few brown spots. If the heat is too high, the skin can burn before the fat has time to render, so keep the sizzle active but not aggressive. Flip and give the second side a shorter sear just to start the color.
Turning the Pan Drippings Into Sauce
Once the chicken comes out, the garlic and tomatoes go into the same skillet. The tomatoes should blister and soften at the edges, and the garlic should smell sweet, not toasted dark. When you add the vinegar, honey, and broth, scrape the bottom of the pan well so every browned bit gets pulled into the sauce. That fond is what keeps the glaze tasting layered instead of one-note.
Finishing the Chicken in the Glaze
Return the thighs skin-side up so the crisp top stays above the sauce while the meat finishes cooking. The sauce should bubble gently and reduce until it coats the back of a spoon. If it looks thin at the end, keep it at a simmer for another minute or two; if it gets too thick, a splash of broth loosens it back up without dulling the flavor. Stir in the butter last, then finish with basil so the herb stays bright.
What to Change When You Want a Different Finish
Boneless Chicken Thighs for Faster Cooking
Boneless thighs cut the cook time down a little and still stay juicy, but they won’t give you the same dramatic crispy skin. Sear them for a shorter time on each side, then finish them in the sauce just until cooked through so they don’t dry out.
Dairy-Free Without Losing the Shine
Leave out the butter and let the sauce reduce a touch longer. You’ll lose a little of that silky finish, but the glaze will still cling well if you simmer it until it lightly coats the spoon.
Lower-Sugar Balsamic Chicken
Cut the honey back by half if you want a sharper glaze with more vinegar bite. The sauce will reduce a little less quickly and taste less sticky-sweet, which works well if you’re serving it with rice or potatoes that can soak up the extra sauce.
Storage and Reheating
- Refrigerator: Store leftovers in an airtight container for up to 4 days. The skin softens in the fridge, but the flavor deepens.
- Freezer: Freeze the chicken and sauce together for up to 2 months. The texture won’t be quite as crisp after thawing, but it still reheats well for a saucy dinner.
- Reheating: Warm gently in a covered skillet over low heat with a splash of broth. High heat dries out the chicken and can make the balsamic glaze go sticky instead of glossy.
Answers to the Questions Worth Asking
One Pan Balsamic Chicken
Ingredients
Equipment
Method
- Season the chicken thighs generously on both sides with salt, pepper, garlic powder, and Italian seasoning.
- Heat olive oil in a large cast iron skillet over medium-high heat and sear chicken skin-side down for 7-8 minutes until skin is deeply golden and crispy.
- Flip the chicken and sear for 3 minutes; then remove to a plate.
- In the same skillet, add whole garlic cloves and cherry tomatoes and cook for 2 minutes until tomatoes begin to blister.
- Pour in balsamic vinegar, honey, and chicken broth, then stir and bring to a boil while scraping up browned bits.
- Return the chicken skin-side up and cook over medium heat for 12-15 minutes until chicken reaches 165°F and the balsamic sauce reduces to a thick glaze.
- Stir in butter until melted, scatter fresh basil over the top, and serve straight from the skillet.